Use AJAX in Laravel
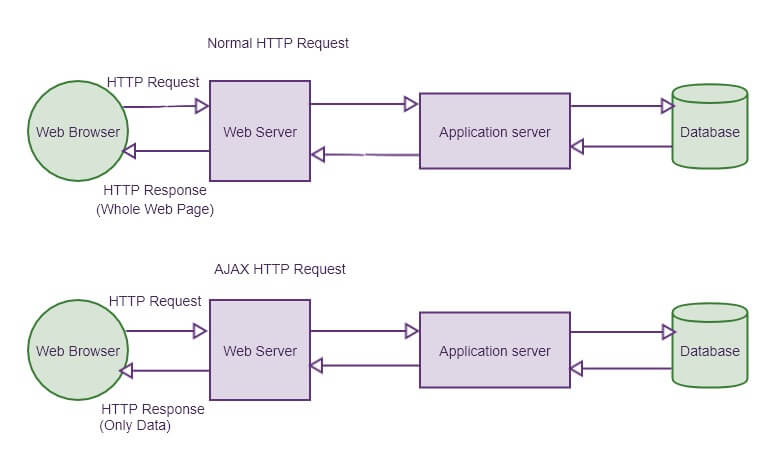
In this article, I’ll show you how to use AJAX in Laravel. In normal request, to get data the browser needs to refresh. But AJAX does the same thing without refreshing the page. It just takes the data from the server and then bind data without reloading the whole page. Take a look at the AJAX request cycle:
Now let’s follow these steps:
Table of Contents
- Install Laravel and Basic Configurations
- Create Model, Controller and Migration
- Configure the Controller
- Create a Blade File
- Create Routes
- Test AJAX Request
Step 1 : Install Laravel and Basic Configurations
Each Laravel project needs this thing. That’s why I have written an article on this topic. Please see this part from here: Install Laravel and Basic Configurations.
Step 2 : Create Model, Controller and Migration
We are going to create a mode, a controller and a migration file. Type this command to create all three things at once:
php artisan make:model Customer -mcr
Navigate to database >> migration and open create_customers_table.php & paste this code:
<?php

use Illuminate\Support\Facades\Schema;
use Illuminate\Database\Schema\Blueprint;
use Illuminate\Database\Migrations\Migration;

class CreateCustomersTable extends Migration
{
    /**
     * Run the migrations.
     *
     * @return void
     */
    public function up()
    {
        Schema::create('customers', function (Blueprint $table) {
            $table->bigIncrements('id');
            $table->string('name');
            $table->string('email');
            $table->timestamps();
        });
    }

    /**
     * Reverse the migrations.
     *
     * @return void
     */
    public function down()
    {
        Schema::dropIfExists('customers');
    }
}
Now run the migration by this command:
php artisan migrate
Step 3 : Configure the Controller
Open CustomerController.php from app/Http/Controllers and paste this code:
<?php

namespace App\Http\Controllers;

use App\Customer;
use Illuminate\Http\Request;

class CustomerController extends Controller
{

    public function form()
    {
        return view('add_customer');
    }

    public function store(Request $request)
    {
        $customer = new Customer();
        $customer->name = $request->name;
        $customer->email = $request->email;
        $customer->save();

        return response()->json([
            'success' => true,
            'message' => 'Customer successfully added'
        ]);
    }

}
Step 4 : Create a Blade File
Go to resources>>views directory and create a file named “add_customer.blade.php“. I’ve created a simple form. Copy and paste this code to your blade file:
<!doctype html>
<html lang="{{ app()->getLocale() }}">
<head>
    <meta charset="utf-8"/>
    <meta http-equiv="X-UA-Compatible" content="IE=edge"/>
    <meta name="viewport" content="width=device-width, initial-scale=1"/>
    <meta name="_token" content="{{csrf_token()}}"/>
    <title>Add Customer</title>
    <link href="{{asset('css/app.css')}}" rel="stylesheet" type="text/css"/>
    <script src="https://code.jquery.com/jquery-3.4.0.min.js"></script>
</head>
<body>
<div class="container" style="margin-top: 50px;">
    <h3 class="text-center">Add Customer</h3>
    <div id="alert_box" class="alert alert-success" style="display:none"></div>
    <form id="myForm">
        <div class="form-group">
            <label for="name">Name:</label>
            <input type="text" class="form-control" id="name">
        </div>
        <div class="form-group">
            <label for="email">Email:</label>
            <input type="email" class="form-control" id="email">
        </div>
        <button class="btn btn-success" id="ajaxSubmit">Add</button>
    </form>
</div>
<script>
    $(function() {
        $.click(function (e) {
            e.preventDefault();
            $.ajaxSetup({
                headers: {
                    'X-CSRF-TOKEN': $('meta[name="_token"]').attr('content')
                }
            });
            $.ajax({
                url: "{{ url('/store_customer') }}",
                method: 'POST',
                data: {
                    name: $('#name').val(),
                    email: $('#email').val(),
                },
                success: function (result) {
                    $('#alert_box').html(result.message);
                    $('#alert_box').show();
                }
            });
        });
    });
</script>
</body>
</html>
Step 5 : Create Routes
We are about to finish. Let’s create two routes in routes/web.php:
Route::get('add_customer', 'CustomerController@form');
Route::post('store_customer', 'CustomerController@store');
Step 6 : Test AJAX Request
Our coding part is done. Run the Laravel project by typing this:
php artisan serve
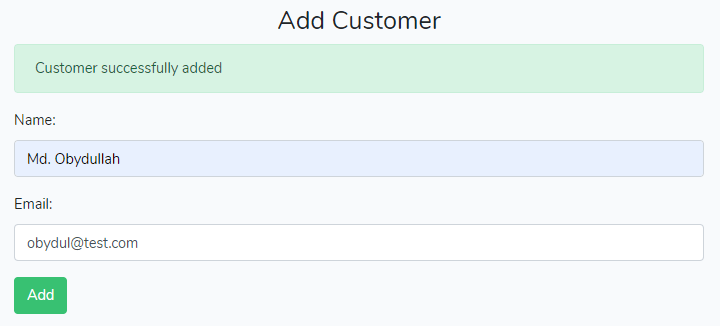
Now visit the add_customer routes from a browser. The URL should like http://localhost:8000/add_customer. You will see a form. Fillup the form and hit the Add button. Here’s my result:
Thank you.
Md Obydullah
Software Engineer | Ethical Hacker & Cybersecurity...
Md Obydullah is a software engineer and full stack developer specialist at Laravel, Django, Vue.js, Node.js, Android, Linux Server, and Ethichal Hacking.