Laravel 9 Livewire SPA CRUD
Hello Artisans, today we'll discuss about SPA (single page application) CRUD with Laravel & Livewire. Livewire is a full-stack frontend framework for Laravel that makes building dynamic interfaces simple, without leaving the comfort of Laravel. It is a frontend framework. For more you can check here So, no more talk, let's see how we can easily crate a simple SPA CRUD application using Laravel & Livewire Application.
Note: Tested on Laravel 9.11
Table of Contents
- Install and configure Livewire
- Create and Configure Livewire Component & View
- Define Routes
- Create and Setup blade File
- Output
Install and configure Livewire
To install Livewire, we just need to fire the below command
composer require calebporzio/livewireThat's it, we've successfully install the Livewire.
Create and Configure Livewire Component & View
Fire the below command to create the Livewire Component & view.
php artisan make:livewire userAfter running the command, it'll create two file in the following path.
- app/Http/Livewire/User.php
- resources/views/livewire/user.php
In this step, we'll work with only component file named User.php. Later we'll work with blade file. So, open the User.php and replace with following codes.
<?php

namespace App\Http\Livewire;

use Livewire\Component;
use App\Models\User as UserModel;

class User extends Component
{
    public $data, $name, $email, $password, $selected_id;
    public $updateMode = false;

    public function render()
    {
        $this->data = UserModel::all();
        return view('livewire.user');
    }
    private function resetInput()
    {
        $this->name = null;
        $this->email = null;
        $this->password = null;
    }
    public function store()
    {
        $this->validate([
            'name' => 'required|min:5',
            'email' => 'required|email:rfc,dns',
            'password' => 'required|min:6'
        ]);

        UserModel::create([
            'name' => $this->name,
            'email' => $this->email,
            'password' => $this->password
        ]);
        $this->resetInput();
    }
    public function edit($id)
    {
        $record = UserModel::findOrFail($id);
        $this->selected_id = $id;
        $this->name = $record->name;
        $this->email = $record->email;
        $this->password = $record->password;
        $this->updateMode = true;
    }
    public function update()
    {
        $this->validate([
            'selected_id' => 'required|numeric',
            'name' => 'required|min:5',
            'email' => 'required|email:rfc,dns',
            'password' => 'required|min:6'
        ]);
        if ($this->selected_id) {
            $record = UserModel::find($this->selected_id);
            $record->update([
                'name' => $this->name,
                'email' => $this->email,
                'password' => $this->password
            ]);
            $this->resetInput();
            $this->updateMode = false;
        }
    }
    public function destroy($id)
    {
        if ($id) {
            UserModel::destroy($id);
        }
    }
}
Define Routes
Now put the below routes in our web.php.
Route::view('users', 'users');Create and Setup blade File
Now we need to create a blade files for viewing the users component and from where we'll create/update user as well as we can see the list of user. So, create four files called
- users.blade.php under resources/views
- app.blade.php under resources/views/layouts
- create.blade.php under resources/views/livewire
- update.blade.php under resources/views/livewire
Now open the files replace with the following corresponding files.
users.blade.php
@extends('layouts.app')
@section('content')
    <div class="flex justify-center">
        @livewire('user')
    </div>
@endsection
app.blade.php
<!doctype html>
<html lang="{{ str_replace('_', '-', app()->getLocale()) }}">
<head>
    <meta charset="utf-8">
    <meta name="viewport" content="width=device-width, initial-scale=1">
    <meta name="csrf-token" content="{{ csrf_token() }}">
    <title>{{ config('app.name', 'Laravel') }}</title>
    <link rel="stylesheet" href="https://cdn.jsdelivr.net/npm/[email protected]/dist/css/bootstrap.min.css">
    <script src="https://cdn.jsdelivr.net/npm/[email protected]/dist/jquery.slim.min.js"></script>
    <script src="https://cdn.jsdelivr.net/npm/[email protected]/dist/umd/popper.min.js"></script>
    <script src="https://cdn.jsdelivr.net/npm/[email protected]/dist/js/bootstrap.bundle.min.js"></script>
    @livewireStyles
</head>
<body>
<div id="app">
    <nav class="navbar navbar-expand-md navbar-light bg-white shadow-sm">
        <div class="container">
            <a class="navbar-brand" href="{{ url('/') }}">
                {{ config('app.name', 'Laravel') }}
            </a>
            <button class="navbar-toggler" type="button" data-toggle="collapse" data-target="#navbarSupportedContent" aria-controls="navbarSupportedContent" aria-expanded="false" aria-label="{{ __('Toggle navigation') }}">
                <span class="navbar-toggler-icon"></span>
            </button>

        </div>
    </nav>

    <main class="py-4">
        @yield('content')
    </main>
</div>
@livewireScripts
</body>
</html>
user.blade.php (which we create in #step2)
<div class="container" style="background: #eeeeee; padding: 20px">
<div class="row justify-content-center">
<div class="col-md-8">
@if (count($errors) > 0)
<div class="alert alert-danger">
<a href="#" class="close" data-dismiss="alert">×</a>
<strong>Sorry!</strong> invalid input.<br><br>
<ul style="list-style-type:none;">
@foreach ($errors->all() as $error)
<li>{{ $error }}</li>
@endforeach
</ul>
</div>
@endif
@if($updateMode)
@include('livewire.update')
@else
@include('livewire.create')
@endif
<table class="table table-striped" style="margin-top:20px;">
<tr>
<td>NO</td>
<td>NAME</td>
<td>EMAIL</td>
<td>ACTION</td>
</tr>
@foreach($data as $row)
<tr>
<td>{{$loop->index + 1}}</td>
<td>{{$row->name}}</td>
<td>{{$row->email}}</td>
<td>
<button wire:click="edit({{$row->id}})" class="btn btn-sm btn-outline-danger py-0">Edit</button> |
<button wire:click="destroy({{$row->id}})" class="btn btn-sm btn-outline-danger py-0">Delete</button>
</td>
</tr>
@endforeach
</table>
</div>
</div>
</div>
create.blade.php
<div>
    <div class="form-group">
        <label for="exampleInputPassword1">Enter Name</label>
        <input type="text" wire:model="name" class="form-control input-sm"  placeholder="Name">
    </div>
    <div class="form-group">
        <label>Enter Email</label>
        <input type="email" class="form-control input-sm" placeholder="Enter email" wire:model="email">
    </div>
    <div class="form-group">
        <label>Enter Password</label>
        <input type="password" class="form-control input-sm" placeholder="Enter Password" wire:model="password">
    </div>
    <button wire:click="store()" class="btn btn-primary">Submit</button>
</div>
update.blade.php
<div>
    <input type="hidden" wire:model="selected_id">
    <div class="form-group">
        <label for="exampleInputPassword1">Enter Name</label>
        <input type="text" wire:model="name" class="form-control input-sm"  placeholder="Name">
    </div>
    <div class="form-group">
        <label>Enter Email</label>
        <input type="email" class="form-control input-sm" placeholder="Enter email" wire:model="email">
    </div>
    <div class="form-group">
        <label>Enter Password</label>
        <input type="password" class="form-control input-sm" placeholder="Enter Password" wire:model="password">
    </div>
    <button wire:click="update()" class="btn btn-primary">Update</button>
</div>
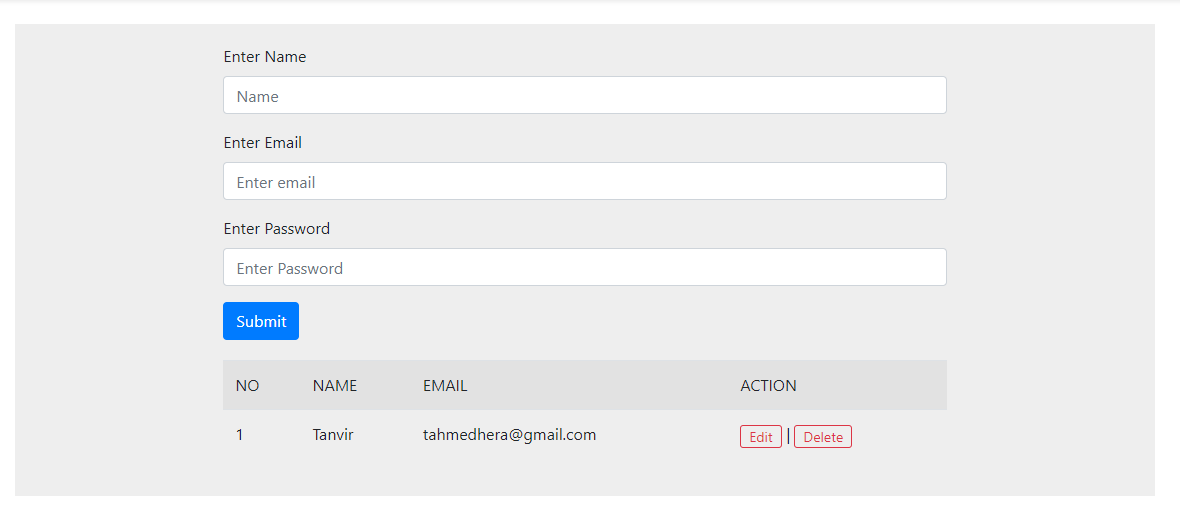
Output
And finally we're ready with our setup. It's time to check our output. Now go to http://127.0.0.1:8000/users, If everything goes well you'll find a below output.
That's it for today. I hope you've enjoyed this tutorial. You can also download this tutorial from GitHub. Thanks for reading. 🙂