How to Implement Authorization using Gates in Laravel 6
In this article, I’m going to share how to implement authorization using gates in Laravel 6. Let’s start:
Table of Contents
- Install Laravel and Basic Configurations
- Generate Auth Scaffolding
- Add Role to User Table
- Create Custom Gates
- Use Gates in View
- Use Gates in Controller
- Use in Route with Middleware
Step 1 : Install Laravel and Basic Configurations
Each Laravel project needs this thing. That’s why I have written an article on this topic. Please see this part from here: Install Laravel and Basic Configurations.
Step 2 : Generate Auth Scaffolding
To generate auth scaffolding, we need to install the laravel/ui package:
composer require laravel/uiNow we’re able to generate auth scaffolding in Laravel 6 using this command:
php artisan ui bootstrap --authTo see good UI, we need to run this last command:
npm install && npm run devStep 3 : Add Role to User Table
After setting up basic configurations, let’s add role column in the user name. We’re going to define 2 roles: admin & user. Run this command to create a migration file:
php artisan make:migration add_role_column_to_users_tableGo to database/migrations folder and open the newly created migration file and update the up() function like this:
public function up()
{
    Schema::table('users', function (Blueprint $table) {
        $table->enum('role', ['admin', 'user'])->default('user');
    });
}
We’ve set the user role as default. Now migrate the migrations:
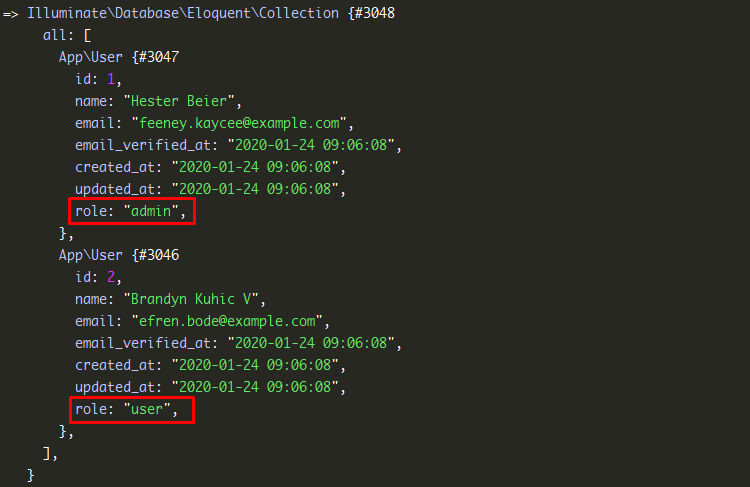
php artisan migrateLet’s insert 2 dummy user data using Laravel Tinker:
# open tinker console
php artisan tinker

# insert 2 data
factory(App\User::class, 2)->create();
After inserting data, from the phpMyAdmin set role to the dummy users.
Step 4 : Create Custom Gates
Now we’re going to define 2 gates for the 2 roles. Navigate to app/Providers folder and open AuthServiceProvider.php file & let’s set gates in boot() function.
public function boot()
{
    $this->registerPolicies();

    // define admin role
    Gate::define('isAdmin', function($user) {
        return $user->role == 'admin';
    });

    // define user role
    Gate::define('isUser', function($user) {
        return $user->role == 'user';
    });
}
Step 5 : Use Gates in View
We can use gates in view easily. The syntax is:
@can('isAdmin')
    Your role: Admin!
@elsecan('isUser')
    Your role: User!
@endcan
Let’s set gates in the dashboard blade file. Open resources/views/home.blade.php and update with this code:
@extends('layouts.app')
@section('content')
<div class="container">
<div class="row justify-content-center">
<div class="col-md-8">
<div class="card">
<div class="card-header">Dashboard</div>
<div class="card-body">
@if (session('status'))
<div class="alert alert-success" role="alert">
{{ session('status') }}
</div>
@endif
You are logged in.
@can('isAdmin')
Your role: Admin!
@elsecan('isUser')
Your role: User!
@endcan
</div>
</div>
</div>
</div>
</div>
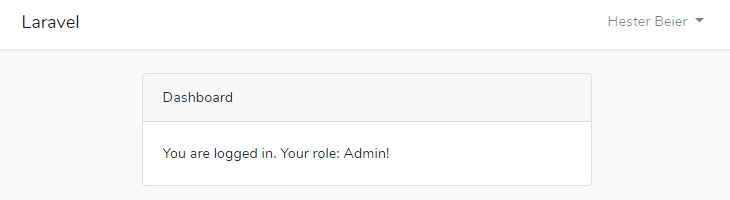
@endsectionAdmin role:
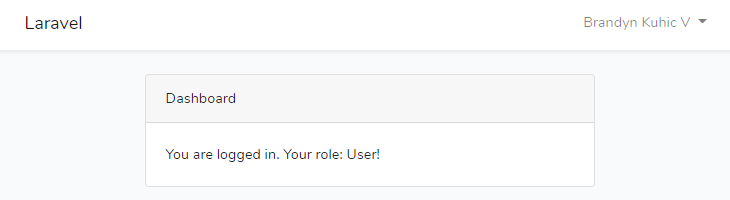
User role:
Step 6 : Use Gates in Controller
Like the view, we can use gates in the controller too. I’m showing some uses.
public function functionName()
{
	  // allows
    if (Gate::allows('isAdmin')) {
        dd('Admin area');
    } else {
        dd('Your role is not Admin');
    }

	  // denies
    if (Gate::denies('isAdmin')) {
        dd('Your role is not Admin');
    } else {
        dd('Admin area');
    }
}
Step 7 : Use in Route with Middleware
Like view & controller, we’re able to use gates in route with middleware. Here’s the example:
Route::get('settings', function () {
    return "This route is for admin role only";
})->middleware('can:isAdmin');

Route::get('profile', function () {
    return "This route is for user role only";
})->middleware('can:isUser');
The tutorial is over. Thank you.
Md Obydullah
Software Engineer | Ethical Hacker & Cybersecurity...
Md Obydullah is a software engineer and full stack developer specialist at Laravel, Django, Vue.js, Node.js, Android, Linux Server, and Ethichal Hacking.