Laravel Two Factor Authentication with Google Authenticator
Hello, today I’m going to share how to set up two-factor authentication with Google Authenticator in Laravel. I’m testing on Laravel 7.0.
I assume that you’ve installed a Laravel app & config basic things. If you didn’t do those things, you can check this article first.
Note: You’ve to install ImageMagick on your server if not installed. You may check this:
- Install ImageMagick (Imagick) PHP Extension on Windows
- Install ImageMagick (Imagick) Extension on RHEL / Centos 7
Table of Contents
- Install Required Package
- Create Model, Migration & Controller
- Setup Eloquent Relationship
- Setup Controller
- Create 2FA Middleware
- Define Routes
- Create Blade Files
- Run Project & Test 2FA
Install Required Package
We’ll use pragmarx/google2fa-laravel package. Run this composer command to install this package:
composer require pragmarx/google2fa-laravelAfter installation successful, run this command to publish the package’s config file:
php artisan vendor:publish --provider="PragmaRX\Google2FALaravel\ServiceProvider"Create Model, Migration & Controller
We need a model, migration & controller for 2FA. Let’s create all using this command:
php artisan make:model LoginSecurity -m -cNow open create_login_securities_table migration file from database/migrations directory and update up() function like this:
public function up()
{
    Schema::create('login_securities', function (Blueprint $table) {
        $table->id();
        $table->integer('user_id');
        $table->boolean('google2fa_enable')->default(false);
        $table->string('google2fa_secret')->nullable();
        $table->timestamps();
    });
}
Run the migration to create tables:
php artisan migrate:refreshSetup Eloquent Relationship
Open User model from app folder and insert this function:
public function loginSecurity()
{
    return $this->hasOne(LoginSecurity::class);
}
Open LoginSecurity model and insert user() function & $fillable array:
protected $fillable = [
    'user_id'
];

public function user()
{
    return $this->belongsTo(User::class);
}
Setup Controller
Open from LoginSecurityController from app/Http/Controllers directory and paste this code:
<?php

namespace App\Http\Controllers;

use App\LoginSecurity;
use Auth;
use Hash;
use Illuminate\Http\Request;

class LoginSecurityController extends Controller
{
    /**
     * Create a new controller instance.
     *
     * @return void
     */
    public function __construct()
    {
        $this->middleware('auth');
    }

    /**
     * Show 2FA Setting form
     */
    public function show2faForm(Request $request){
        $user = Auth::user();
        $google2fa_url = "";
        $secret_key = "";

        if($user->loginSecurity()->exists()){
            $google2fa = (new \PragmaRX\Google2FAQRCode\Google2FA());
            $google2fa_url = $google2fa->getQRCodeInline(
                'MyNotePaper Demo',
                $user->email,
                $user->loginSecurity->google2fa_secret
            );
            $secret_key = $user->loginSecurity->google2fa_secret;
        }

        $data = array(
            'user' => $user,
            'secret' => $secret_key,
            'google2fa_url' => $google2fa_url
        );

        return view('auth.2fa_settings')->with('data', $data);
    }

    /**
     * Generate 2FA secret key
     */
    public function generate2faSecret(Request $request){
        $user = Auth::user();
        // Initialise the 2FA class
        $google2fa = (new \PragmaRX\Google2FAQRCode\Google2FA());

        // Add the secret key to the registration data
        $login_security = LoginSecurity::firstOrNew(array('user_id' => $user->id));
        $login_security->user_id = $user->id;
        $login_security->google2fa_enable = 0;
        $login_security->google2fa_secret = $google2fa->generateSecretKey();
        $login_security->save();

        return redirect('/2fa')->with('success',"Secret key is generated.");
    }

    /**
     * Enable 2FA
     */
    public function enable2fa(Request $request){
        $user = Auth::user();
        $google2fa = (new \PragmaRX\Google2FAQRCode\Google2FA());

        $secret = $request->input('secret');
        $valid = $google2fa->verifyKey($user->loginSecurity->google2fa_secret, $secret);

        if($valid){
            $user->loginSecurity->google2fa_enable = 1;
            $user->loginSecurity->save();
            return redirect('2fa')->with('success',"2FA is enabled successfully.");
        }else{
            return redirect('2fa')->with('error',"Invalid verification Code, Please try again.");
        }
    }

    /**
     * Disable 2FA
     */
    public function disable2fa(Request $request){
        if (!(Hash::check($request->get('current-password'), Auth::user()->password))) {
            // The passwords matches
            return redirect()->back()->with("error","Your password does not matches with your account password. Please try again.");
        }

        $validatedData = $request->validate([
            'current-password' => 'required',
        ]);
        $user = Auth::user();
        $user->loginSecurity->google2fa_enable = 0;
        $user->loginSecurity->save();
        return redirect('/2fa')->with('success',"2FA is now disabled.");
    }
}
In the controller, we’ve set 2FA settings form, generate secret key function and enable & disable option.
Create 2FA Middleware
This package provides us with a middleware that can be directly used to enable two-factor authentication.
Go to the app folder and create a directory named Support. Under the support folder, create a file called Google2FAAuthenticator.php & paste this code:
<?php

namespace App\Support;

use PragmaRX\Google2FALaravel\Support\Authenticator;

class Google2FAAuthenticator extends Authenticator
{
    protected function canPassWithoutCheckingOTP()
    {
        if($this->getUser()->loginSecurity == null)
            return true;
        return
            !$this->getUser()->loginSecurity->google2fa_enable ||
            !$this->isEnabled() ||
            $this->noUserIsAuthenticated() ||
            $this->twoFactorAuthStillValid();
    }

    protected function getGoogle2FASecretKey()
    {
        $secret = $this->getUser()->loginSecurity->{$this->config('otp_secret_column')};

        if (is_null($secret) || empty($secret)) {
            throw new InvalidSecretKey('Secret key cannot be empty.');
        }

        return $secret;
    }

}
After that create a middleware named LoginSecurityMiddleware using this command:
php artisan make:middleware LoginSecurityMiddlewareOpen the middleware from app/Http/Middleware and paste this code:
<?php

namespace App\Http\Middleware;

use App\Support\Google2FAAuthenticator;
use Closure;

class LoginSecurityMiddleware
{
    /**
     * Handle an incoming request.
     *
     * @param  \Illuminate\Http\Request  $request
     * @param  \Closure  $next
     * @return mixed
     */
    public function handle($request, Closure $next)
    {
        $authenticator = app(Google2FAAuthenticator::class)->boot($request);

        if ($authenticator->isAuthenticated()) {
            return $next($request);
        }

        return $authenticator->makeRequestOneTimePasswordResponse();
    }
}
Now open the Kernel.php from the app/Http directory & register our middleware to $routeMiddleware array.
protected $routeMiddleware = [
    // ---------
    '2fa' => \App\Http\Middleware\LoginSecurityMiddleware::class,
];
Define Routes
Go to the routes folder, open web.php & define these routes:
Route::group(['prefix'=>'2fa'], function(){
    Route::get('/','LoginSecurityController@show2faForm');
    Route::post('/generateSecret','LoginSecurityController@generate2faSecret')->name('generate2faSecret');
    Route::post('/enable2fa','LoginSecurityController@enable2fa')->name('enable2fa');
    Route::post('/disable2fa','LoginSecurityController@disable2fa')->name('disable2fa');

    // 2fa middleware
    Route::post('/2faVerify', function () {
        return redirect(URL()->previous());
    })->name('2faVerify')->middleware('2fa');
});

// test middleware
Route::get('/test_middleware', function () {
    return "2FA middleware work!";
})->middleware(['auth', '2fa']);
Create Blade Files
We’re about to finish. We need to create two view files only. Navigate to resources/views/auth directory and create 2 files named 2fa_settings.blade.php and 2fa_verify.blade.php.
Open 2fa_settings blade file and paste this code:
@extends('layouts.app')
@section('content')
    <div class="container">
        <div class="row justify-content-md-center">
            <div class="col-md-8">
                <div class="card">
                    <div class="card-header"><strong>Two Factor Authentication</strong></div>
                    <div class="card-body">
                        <p>Two factor authentication (2FA) strengthens access security by requiring two methods (also referred to as factors) to verify your identity. Two factor authentication protects against phishing, social engineering and password brute force attacks and secures your logins from attackers exploiting weak or stolen credentials.</p>

                        @if (session('error'))
                            <div class="alert alert-danger">
                                {{ session('error') }}
                            </div>
                        @endif
                        @if (session('success'))
                            <div class="alert alert-success">
                                {{ session('success') }}
                            </div>
                        @endif

                        @if($data['user']->loginSecurity == null)
                            <form class="form-horizontal" method="POST" action="{{ route('generate2faSecret') }}">
                                {{ csrf_field() }}
                                <div class="form-group">
                                    <button type="submit" class="btn btn-primary">
                                        Generate Secret Key to Enable 2FA
                                    </button>
                                </div>
                            </form>
                        @elseif(!$data['user']->loginSecurity->google2fa_enable)
                            1. Scan this QR code with your Google Authenticator App. Alternatively, you can use the code: <code>{{ $data['secret'] }}</code><br/>
                            <img src="{{$data['google2fa_url'] }}" alt="">
                            <br/><br/>
                            2. Enter the pin from Google Authenticator app:<br/><br/>
                            <form class="form-horizontal" method="POST" action="{{ route('enable2fa') }}">
                                {{ csrf_field() }}
                                <div class="form-group{{ $errors->has('verify-code') ? ' has-error' : '' }}">
                                    <label for="secret" class="control-label">Authenticator Code</label>
                                    <input id="secret" type="password" class="form-control col-md-4" name="secret" required>
                                    @if ($errors->has('verify-code'))
                                        <span class="help-block">
                                        <strong>{{ $errors->first('verify-code') }}</strong>
                                        </span>
                                    @endif
                                </div>
                                <button type="submit" class="btn btn-primary">
                                    Enable 2FA
                                </button>
                            </form>
                        @elseif($data['user']->loginSecurity->google2fa_enable)
                            <div class="alert alert-success">
                                2FA is currently <strong>enabled</strong> on your account.
                            </div>
                            <p>If you are looking to disable Two Factor Authentication. Please confirm your password and Click Disable 2FA Button.</p>
                            <form class="form-horizontal" method="POST" action="{{ route('disable2fa') }}">
                                {{ csrf_field() }}
                                <div class="form-group{{ $errors->has('current-password') ? ' has-error' : '' }}">
                                    <label for="change-password" class="control-label">Current Password</label>
                                        <input id="current-password" type="password" class="form-control col-md-4" name="current-password" required>
                                        @if ($errors->has('current-password'))
                                            <span class="help-block">
                                        <strong>{{ $errors->first('current-password') }}</strong>
                                        </span>
                                        @endif
                                </div>
                                <button type="submit" class="btn btn-primary ">Disable 2FA</button>
                            </form>
                        @endif
                    </div>
                </div>
            </div>
        </div>
    </div>
@endsection
Then open 2fa_verify blade file and paste:
@extends('layouts.app')
@section('content')
    <div class="container">
        <div class="row justify-content-md-center">
            <div class="col-md-8 ">
                <div class="card">
                    <div class="card-header">Two Factor Authentication</div>
                    <div class="card-body">
                        <p>Two factor authentication (2FA) strengthens access security by requiring two methods (also referred to as factors) to verify your identity. Two factor authentication protects against phishing, social engineering and password brute force attacks and secures your logins from attackers exploiting weak or stolen credentials.</p>

                        @if ($errors->any())
                            <div class="alert alert-danger">
                                <ul>
                                    @foreach ($errors->all() as $error)
                                        <li>{{ $error }}</li>
                                    @endforeach
                                </ul>
                            </div>
                        @endif

                        Enter the pin from Google Authenticator app:<br/><br/>
                        <form class="form-horizontal" action="{{ route('2faVerify') }}" method="POST">
                            {{ csrf_field() }}
                            <div class="form-group{{ $errors->has('one_time_password-code') ? ' has-error' : '' }}">
                                <label for="one_time_password" class="control-label">One Time Password</label>
                                <input id="one_time_password" name="one_time_password" class="form-control col-md-4"  type="text" required/>
                            </div>
                            <button class="btn btn-primary" type="submit">Authenticate</button>
                        </form>
                    </div>
                </div>
            </div>
        </div>
    </div>
@endsection
Last task, open config/google2fa.php file and set one-time password view file path:
/*
 * One Time Password View.
 */
'view' => 'auth.2fa_verify',
This view will be shown to the user to enter OTP.
Run Project & Test 2FA
Our application is ready. Let’s run the project and test 2FA. After running the app, login to app and visit this route:
http://exmaple.com/2faIf everything is okay, you’ll see a page like this:
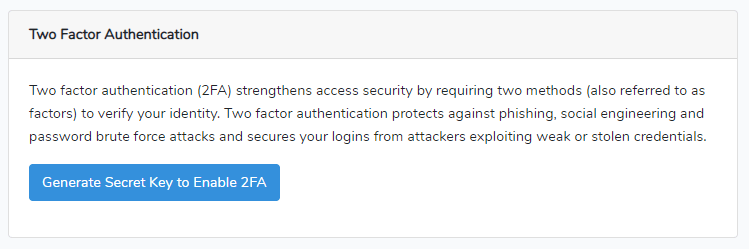
Then click the “Generate Secret Key…” button. It’ll generate a key and display this info:
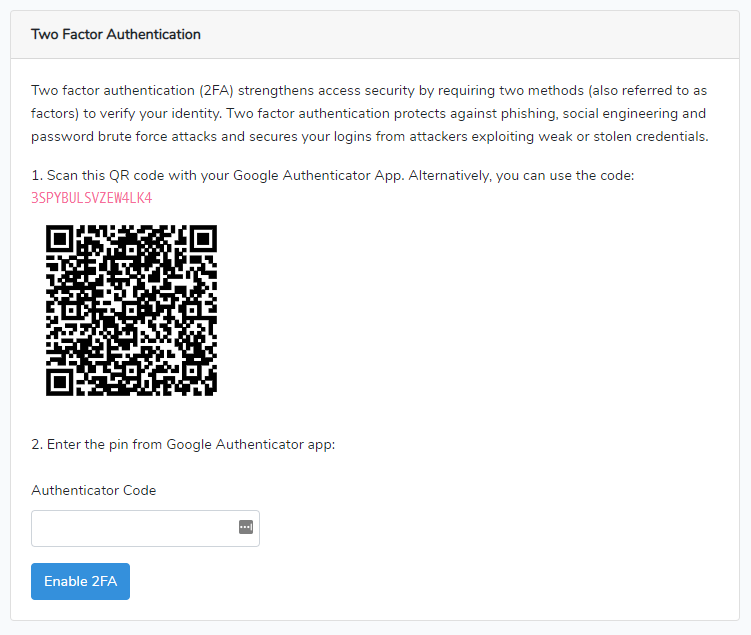
Open the Google Authenticator application and scan the QR code. Then the app will show a code. Enter the code to enable 2FA.
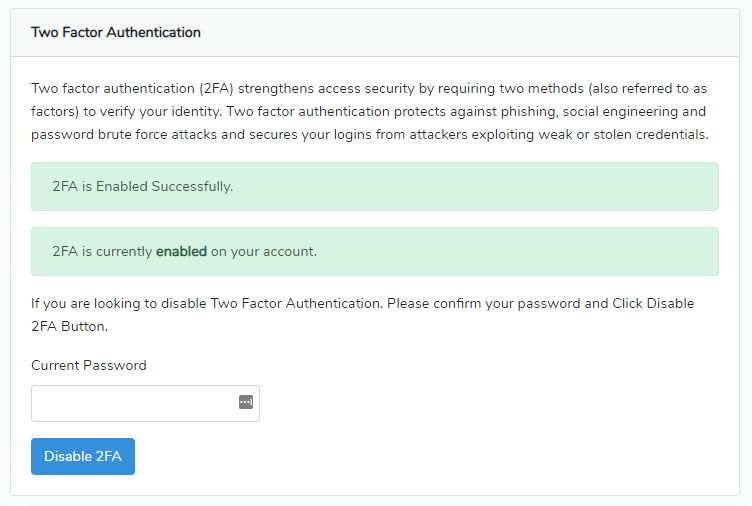
After entering the correct code, the 2FA will be enabled on your account.
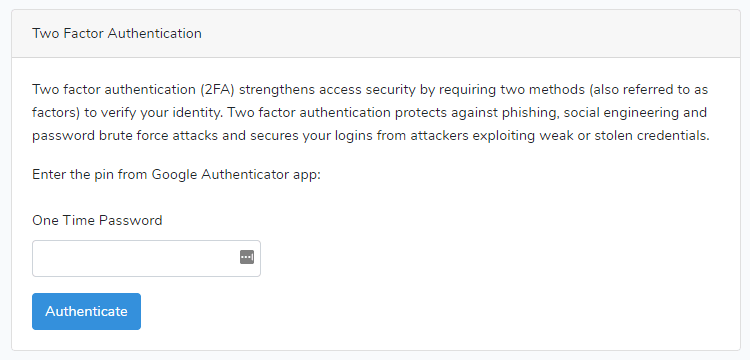
Let’s test middleware: Logout and login again. Then visit this route:
http://exmaple.com/test_middlewareIt’ll ask to provide OTP like:
That’s it. You’ll find more functionalities from pragmarx/google2fa-laravel‘s GitHub repo.
The tutorial is over. You can download this project from GitHub. Thank you.
Md Obydullah
Software Engineer | Ethical Hacker & Cybersecurity...
Md Obydullah is a software engineer and full stack developer specialist at Laravel, Django, Vue.js, Node.js, Android, Linux Server, and Ethichal Hacking.