Create and Use Custom Facade in Laravel 7.x
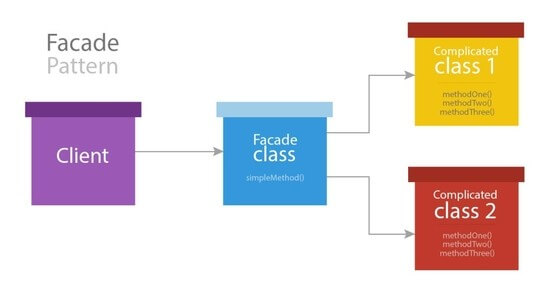
The Facade pattern is a software design pattern that is often used in object-oriented programming. A facade is, in fact, a class wrapping a complex library to provide a simpler and more readable interface to it.
In this article, we’re going to create a custom Facade and use it. I’m testing on Laravel 7.17.2. Let’s start:
Table of Contents
Create a Class
Go to app folder and create a folder named CustomFacades. Under CustomFacades directory create a class called CustomClass.php. Then paste this code:
<?php

namespace App\CustomFacades;

class CustomClass
{
    public static function greet($name)
    {
        return "Hello " . $name;
    }
}
Create Service Provider
We need a service prodiver for our custom facades. Let’s create by hitting this command:
php artisan make:provider CustomServiceProviderAfter creating the service provider, open the file and paste this code:
<?php

namespace App\Providers;

use Illuminate\Support\ServiceProvider;

class CustomServiceProvider extends ServiceProvider
{
    /**
     * Register services.
     *
     * @return void
     */
    public function register()
    {
        $this->app->bind('customClass', function () {
            return new \App\CustomFacades\CustomClass;
        });
    }

    /**
     * Bootstrap services.
     *
     * @return void
     */
    public function boot()
    {
    }
}
We’ve registered our CustomClass in the service provider.
Create Facade Class
Let’s now create a facade class to access our CustomClass. Create CustomClassFacade.php under app\CustomFacades folder & paste this code:
<?php

namespace App\CustomFacades;

use Illuminate\Support\Facades\Facade;

class CustomClassFacade extends Facade
{
    protected static function getFacadeAccessor()
    {
        return 'customClass';
    }
}
Define Route and Test
Open routes/web.php file and define a test route:
<?php

use App\CustomFacades\CustomClass;
use Illuminate\Support\Facades\Route;

Route::get('test', function(){
    $result = CustomClass::greet('Obydul');
    dd($result);
});
Now visit the route and see the output.
That’s it. Thanks for reading.
Md Obydullah
Software Engineer | Ethical Hacker & Cybersecurity...
Md Obydullah is a software engineer and full stack developer specialist at Laravel, Django, Vue.js, Node.js, Android, Linux Server, and Ethichal Hacking.