Vue.js Routing From Scratch With CLI
In this tutorial, I am going to share how to route in Vue.js using CLI(
command line interface). For the Vue project, it’s the best way to use Vue.js.
This allows your project to stay up-to-date for the long run. For a very simple project, you can use CDN.
I have written an article for a simple project. You can see this if you need: Vue.js Routing From Scratch Using CDN Without CLI.
Table of Contents
- Install Vue CLI and Create a Project
- Install Necessary Dependencies
- Add Bootstrap to Project
- Add Vue Components
- Define Routes
- Full App.vue File
- Solve Error: Mixed spaces and tabs
- Run and Test
Step 1 : Install Vue CLI and Create a Project
You can install Vue CLI using NPM or Yarn. Typing this command:
npm install -g @vue/cli-service-global
# or
yarn global add @vue/cli-service-global
Then let’s create a project. Type this command to create a project:
vue create cli-simple-routingYou have to pick a preset. Choose default and hit enter. Normally it’s default.
Navigate to the folder:
cd cli-simple-routing
Step 2 : Install Necessary Dependencies
First, we have to install vue-router. Let’s do it:
npm install --save vue-routerFor front-end, we are going to install bootstrap, jQuery, and popper.js. We can install these three by one command:
npm install bootstrap jquery popper.js --saveStep 3 : Add Bootstrap to Project
We have already installed Bootstrap in our project. Open main.js from src folder using an editor and add these two lines:
import 'bootstrap'
import 'bootstrap/dist/css/bootstrap.min.css'
So, the main.js looks like:
import Vue from 'vue'
import App from './App.vue'

import 'bootstrap'
import 'bootstrap/dist/css/bootstrap.min.css'

Vue.config.productionTip = false

new Vue({
  render: h => h(App),
}).$mount('#app')
Step 4 : Add Vue Components
Go to src>components folder an create three files called Home.vue, About.vue, and Contact.vue. Then paste these codes:
<template>
    <div>
      <h1>Home</h1>
      <span>This is home page</span>
    </div>
</template><template>
<div>
<h1>About</h1>
<span>This is about page</span>
</div>
</template><template>
<div>
<h1>Contact</h1>
<span>This is contact page</span>
</div>
</template>Step 5 : Define Routes
Let’s define the routes in App.vue file:
<script>
import Vue from 'vue'
import VueRouter from 'vue-router'

Vue.use(VueRouter)

import Home from './components/Home.vue'
import About from './components/About.vue'
import Contact from './components/Contact.vue'

const router = new VueRouter({
  mode: 'history',
  base: __dirname,
  routes: [
    { path: '/', component: Home, meta:{title: 'Home'} },
    { path: '/about', component: About, meta:{title: 'About'} },
    { path: '/contact', component: Contact, meta:{title: 'Contact'} }
  ]
})

// set dynamic meta title
router.beforeEach((to, from, next) => {
  document.title = to.meta.title
  next()
});

export default {
  name: 'app',
  router
}
</script>
Now we have to connect to HTML part.
Step 6 : Full App.vue File
I have created simple Bootstrap navbar and set router-view. So the final App.vue file looks like:
<template>
  <div id="app" class="container">
    <nav class="navbar navbar-expand-lg navbar-light" style="background-color: #e3f2fd;">
      <div class="collapse navbar-collapse" id="navbarTogglerDemo03">
        <ul class="navbar-nav mr-auto mt-2 mt-lg-0">
        <li> <router-link class="nav-link" to="/"> Home </router-link> </li>
        <li> <router-link class="nav-link" to="about"> About </router-link> </li>
        <li> <router-link class="nav-link" to="contact"> Contact </router-link> </li>
        </ul>
      </div>
    </nav>
    <div class="text-center" style="margin-top: 20px;">
      <router-view></router-view>
    </div>
  </div>
</template>

<script>
import Vue from 'vue'
import VueRouter from 'vue-router'

Vue.use(VueRouter)

import Home from './components/Home.vue'
import About from './components/About.vue'
import Contact from './components/Contact.vue'

const router = new VueRouter({
  mode: 'history',
  base: __dirname,
  routes: [
    { path: '/', component: Home, meta:{title: 'Home'} },
    { path: '/about', component: About, meta:{title: 'About'} },
    { path: '/contact', component: Contact, meta:{title: 'Contact'} }
  ]
})

// set dynamic meta title
router.beforeEach((to, from, next) => {
  document.title = to.meta.title
  next()
});

export default {
  name: 'app',
  router
}
</script>

<style>
#app {
  text-align: center;
  margin-top: 50px;
}
</style>
Step 7 : Solve Error: Mixed spaces and tabs
We have completed all the tasks. Now it’s ready to run. But if we run this project, we may get an error like this:
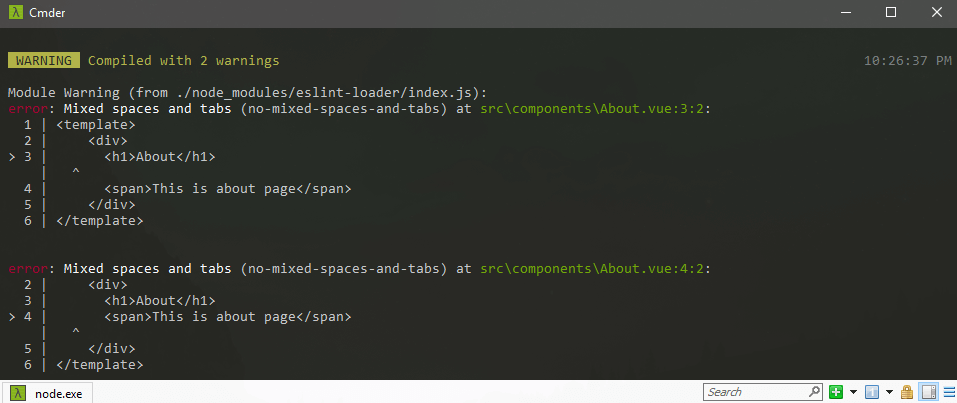
To solve this, in the root folder of the project create a file called “.eslintrc.js” and paste this code:
module.exports = {
  extends: [
    'plugin:vue/recommended'
  ],
  rules: {
    "no-mixed-spaces-and-tabs": 0,
  }
}
Step 8 : Run and Test
Let’s run the app:
npm run serve
Visit the project URL http://localhost:8080 and see the output:

Note: After running the project, if the router doesn’t work, then you can check Server Configurations and then try.
You can download this project from GitHub.
We have successfully completed Vue CLI Routing project.
Md Obydullah
Software Engineer | Ethical Hacker & Cybersecurity...
Md Obydullah is a software engineer and full stack developer specialist at Laravel, Django, Vue.js, Node.js, Android, Linux Server, and Ethichal Hacking.