Generate PDF with Graph in Laravel using Laravel Snappy
Today we will generate PDF with graph in Laravel. Laravel Snappy is better than other packages to do this. Because it supports javascript. We need to install wkhtmltopdf and wkhtmltoimage before installing Laravel Snappy. So, let’s start:
Table of Contents
- Install wkhtmltopdf and wkhtmltoimage
- Install Laravel Snappy
- Snappy Configuration
- Make Controller
- Create View File
- Register Routes and See Output
Step 1 : Install wkhtmltopdf and wkhtmltoimage
The wkhtmltopdf converts HTML to PDF. It’s a great feature. Let’s install them:
For x64 systems:
composer require h4cc/wkhtmltopdf-amd64 0.12.x
composer require h4cc/wkhtmltoimage-amd64 0.12.x
For x86 systems:
composer require h4cc/wkhtmltopdf-i386 0.12.x
composer require h4cc/wkhtmltoimage-i386 0.12.x
For Windows:
composer require wemersonjanuario/wkhtmltopdf-windows "0.12.2.3"
Step 2 : Install Laravel Snappy
Let’s install by this command:
composer require barryvdh/laravel-snappy
Laravel 5.5 uses Package Auto-Discovery. If your project version is older then you need to do register manually.
Manual register: Open config/app.php file and this line in the providers array:
Barryvdh\Snappy\ServiceProvider::class,Optionally you can use the Facade for shorter code. Add this to aliase (facades) array:
'PDF' => Barryvdh\Snappy\Facades\SnappyPdf::class,
'SnappyImage' => Barryvdh\Snappy\Facades\SnappyImage::class,
Step 3 : Snappy Configuration
Publish the Snappy config file:
php artisan vendor:publish --provider="Barryvdh\Snappy\ServiceProvider"
Now open the config file from config/snappy.php:
# For Windows:
The pdf and image’s binary will load from wemersonjanuario\wkhtmltopdf-windows package. Here’s the final config file:
<?php

return [
    'pdf' => array(
        'enabled' => true,
        'binary' => base_path('vendor\wemersonjanuario\wkhtmltopdf-windows\bin\64bit\wkhtmltopdf'),
        'timeout' => false,
        'options' => array(),
        'env' => array(),
    ),
    'image' => array(
        'enabled' => true,
        'binary' => 'vendor\wemersonjanuario\wkhtmltopdf-windows\bin\64bit\wkhtmltoimage',
        'timeout' => false,
        'options' => array(),
        'env' => array(),
    ),
];
# For other systems:
The pdf and image’s binary will load from h4cc/wkhtmltopdf and h4cc/wkhtmltoimage packages. So, the config file looks like:
<?php

return [
    'pdf' => array(
        'enabled' => true,
        'binary' => base_path('vendor/h4cc/wkhtmltopdf-amd64/bin/wkhtmltopdf-amd64'),
        'timeout' => false,
        'options' => array(),
        'env' => array(),
    ),
    'image' => array(
        'enabled' => true,
        'binary' => 'vendor/h4cc/wkhtmltoimage-amd64/bin/wkhtmltoimage-amd64',
        'timeout' => false,
        'options' => array(),
        'env' => array(),
    ),
];
# If error 126 Occurs: If you see the error 126 (not for Windows users), then you can fix the error in this way:
You need to copy the wkhtmltopdf-amd64 and wkhtmltopdf-amd64 files to /usr/local/bin/ folder of your system. Let’s do this:
cp vendor/h4cc/wkhtmltoimage-amd64/bin/wkhtmltoimage-amd64 /usr/local/bin/
cp vendor/h4cc/wkhtmltopdf-amd64/bin/wkhtmltopdf-amd64 /usr/local/bin/
To make it executable, you need to provide proper permission.
chmod +x /usr/local/bin/wkhtmltoimage-amd64
chmod +x /usr/local/bin/wkhtmltopdf-amd64
Now change the binary path of the config like this:
<?php

return [
    'pdf' => array(
        'enabled' => true,
        'binary' => base_path('/usr/local/bin/wkhtmltopdf-amd64'),
        'timeout' => false,
        'options' => array(),
        'env' => array(),
    ),
    'image' => array(
        'enabled' => true,
        'binary' => '/usr/local/bin/wkhtmltoimage-amd64',
        'timeout' => false,
        'options' => array(),
        'env' => array(),
    ),
];
Step 4 : Make Controller
After completing the configuration, let’s make a controller named PDFController by typing this artisan command:
php artisan make:controller PDFController
Open the controller from app\Http\Controllers. In this controller, we are going to create two functions. One for seeing the preview of our PDF and another to generate PDF.
Here’s the controller with two functions:
<?php

namespace App\Http\Controllers;

class PDFController extends Controller
{
    // function to display preview
    public function preview()
    {
        return view('graph');
    }

    // function to generate PDF
    public function generatePDF()
    {
        $pdf = \PDF::loadView('graph');
        $pdf->setOption('enable-javascript', true);
        $pdf->setOption('javascript-delay', 5000);
        $pdf->setOption('enable-smart-shrinking', true);
        $pdf->setOption('no-stop-slow-scripts', true);
        return $pdf->download('graph.pdf');
    }
}
Step 5 : Create View File
Let’s create the view file. Go to resources/views directory and make a file called graph.blade.php. Then open the blade file and paste this code:
<!DOCTYPE html>
<html>
<head>
<meta http-equiv="Content-Type" content="text/html; charset=utf-8"/>
<style>
.pie-chart {
width: 600px;
height: 400px;
margin: 0 auto;
}
</style>
{{-- make sure you are using http, and not https --}}
<script type="text/javascript" src="https://www.google.com/jsapi"></script>
<script type="text/javascript">
function init() {
google.load("visualization", "1.1", {
packages: ["corechart"],
callback: 'drawChart'
});
}
function drawChart() {
var data = new google.visualization.DataTable();
data.addColumn('string', 'Pizza');
data.addColumn('number', 'Populartiy');
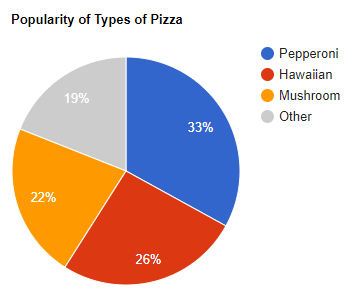
data.addRows([
['Pepperoni', 33],
['Hawaiian', 26],
['Mushroom', 22],
['Sausage', 10], // Below limit.
['Anchovies', 9] // Below limit.
]);
var options = {
title: 'Popularity of Types of Pizza',
sliceVisibilityThreshold: .2
};
var chart = new google.visualization.PieChart(document.getElementById('chart_div'));
chart.draw(data, options);
}
</script>
</head>
<body onload="init()">
<h2 style="text-align: center; ">Generate PDF with Graph in Laravel</h2>
<div id="chart_div" class="pie-chart"></div>
<h2 style="text-align: center; ">MyNotePaper.com</h2>
</body>
</html>Step 6 : Register Routes and See Output
Now we need to define web routes from routes/web.php. Let’s do that:
Route::get('preview', 'PDFController@preview');
Route::get('generate-pdf', 'PDFController@generatePDF');
We’ve completed all the tasks. It’s time to run the project. Let’s run and see the output.
To see the preview, go to http://localhost:8000/preview route and to see generate the PDF with graph, go to http://localhost:8000/generate-pdf route (download will automatically start).
The Preview:
So, we’ve generated PDF with chart. You can download this project from GitHub. Thank you.
Md Obydullah
Software Engineer | Ethical Hacker & Cybersecurity...
Md Obydullah is a software engineer and full stack developer specialist at Laravel, Django, Vue.js, Node.js, Android, Linux Server, and Ethichal Hacking.