Build a Super Fast Google Chrome Extension Using Vue.js
Today I’m going to make an interesting thing. I’ll build a Google Chrome extension using Vue.js. The name of the extension is “Search on MyNotePaper”. So, let’s start.
Table of Contents
- Create a Project using Vue CLI
- Load Project to Chrome
- Make UI of Extension
- See the Output
- Resources & Info
Step 1 : Create a Project using Vue CLI
We will use this great tool vue-web-extension (look at their GitHub page) to create the Google Chrome extension. You need to install Vue CLI if not installed on your PC.
npm install -g @vue/cli
# or,
yarn global add @vue/cli
We need to install vue-init tool for pulling template:
npm install -g @vue/cli-initNow let’s create a project by running this command:
vue init kocal/vue-web-extension search-on-mynotepaperYou will be asked a few questions like:
1. Project name: search-on-mynotepaper
2. Project description: A search form web extension using Vue.js
3. Author: Md Obydullah
4. License: MIT
5. Use Mozilla's web-extension polyfill? (https://github.com/mozilla/webextension-polyfill) Yes
6. Provide an options page? (https://developer.chrome.com/extensions/options) No
7. Install vue-router? No
8. Install vuex? No
9. Install axios? No
10. Install ESLint? No
11. Install Prettier? No
12. Automatically install dependencies? npm
Now go to the project directory cd search-on-mynotepaper and run watch (Hot Reloading) command:
npm run watch:devThis command will preview the output instantly.
Step 2 : Load Project to Chrome
To view the live preview of our extension, we need to enable the development environment. Let’s enable development mode. Visit chrome://extensions and turn on Development mode. Then click “Load unpacked” button and linked the dist folder of your project. Last, Enable the extension.

Step 3 : Make UI of Extension
Let’s create the UI of our extension. Navigate to src/popup folder and open App.vue file. You can design your extension as you want. I’ve created a simple search form. Here’s the code:
<template>
  <div class="extension">
    <h2>Search on MyNotePapar</h2>

    <input v-model="keyword" placeholder="Enter keyword">
    <button v-on:click="buttonSearch">Search</button>

    <p>To get more articles visit <a target="_blank" href="https://shouts.dev/" style="text-decoration: none;">mynotepaper.com</a></p>
  </div>
</template>

<script>
const browser = require("webextension-polyfill");
export default {
  data() {
    return {
      keyword: "",
    };
  },
  methods: {
    buttonSearch() {
      	window.open("https://shouts.dev/?s=" + this.keyword);
    }
  }
};
</script>

<style lang="scss" scoped>
p {
  font-size: 16px;
}
.extension {
  width: 300px;
  text-align: center;
}
</style>
Open background.js file from src folder and paste this code:
global.browser = require('webextension-polyfill')Step 4 : See the Output
Our simple extension is ready to use. Let’s see the output. At the right top of the chrome browser, click on the icon of our extension. Then you’ll see the output like this:
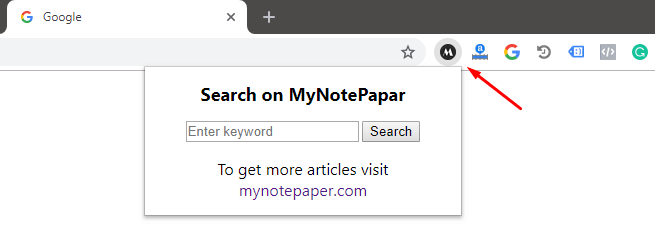
From this search box, we can search for anything on mynotepaper.com.
Step 5 : Resources & Info
1. Manifest.json: The manifest.json file contains the extension’s name, permissions, icons, etc.
2. Content Script: Content scripts are files that run in the context of web pages. By using the standard Document Object Model (DOM), they are able to read details of the web pages the browser visits, make changes to them and pass information to their parent extension.
Usage of content scripts:
"content_scripts": [
  {
    "matches": [
      "<all_urls>" // can use different matching patterns here
    ],
    "js": ["content.js"]
  }
]
With the option matches you can explicitly tell the browser in which pages that you visit the content.js should be injected. For more matching patterns visit: match_patterns.
3. Set icons: In the src/icons folder you need to put your custom icons.
"icons": {
  "48": "icons/icon_48.png",
  "128": "icons/icon_128.png"
},
"browser_action": {
  "default_icon": "icons/icon_48.png", // optional
},
4. Background script: A background page is loaded when it is needed, and unloaded when it goes idle. Read more from here. The usage:
"background": {
  "scripts": [
    "background.js"
  ]
},
5. Messaging: Read Google’s official messaging documentation.
A more complete web extension is WhosNext.
The tutorial is over. You can download this project from GitHub. Thank you.
Md Obydullah
Software Engineer | Ethical Hacker & Cybersecurity...
Md Obydullah is a software engineer and full stack developer specialist at Laravel, Django, Vue.js, Node.js, Android, Linux Server, and Ethichal Hacking.