How to Install ImageMagick PHP Extension on Windows
In this article, I’m going to share how to install imagick PHP extension on Windows.
Table of Contents
Find Info
We need to find PHP version, thread safety and architecture. We can find these info in some ways. We can get these info from phpinfo(); very easily.

Please take a look at the red marks. We’ve found the three info.
Download Files
We need to download ImageMagick on Windows. Visit imagemagick website and download ImageMagick-<version>-Q16-<architecture>-dll.exe file & then install.
After installation, you can check the installed version from CMD:
magick -versionNow, we have to download Imagick for PHP and select the DLL from the latest available version.
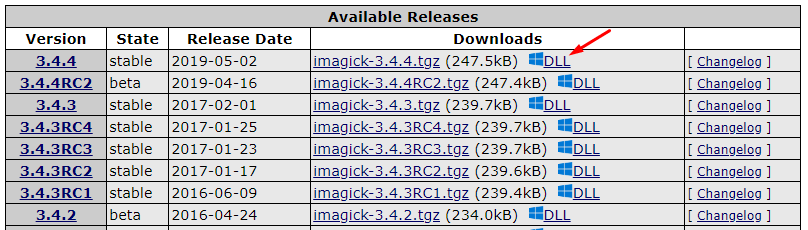
Click on the DLL link. You’ll be redirected to the new page. Scroll down the page and you’ll find the DLL List.

From the above list, please match with your PHP version, architecture and thread safe info and download the file. The downloaded file will look like php_imagick-<version>-<thread-safe-or-not>-<php-compiled-version>-<architecture>.zip.
Lastly, we have to download required Imagick binaries. From the page, download the binaries according to your php & architecture info.

Note: You can easily download Imagick for PHP & Binaries from this link.
Configurations
After downloading all files:
- Extract
php_imagick.dllfile fromphp_imagick-….zip, and save it to theextdirectory of your PHP installation. Example: xampp’s PHP locationC:\xampp\php\ext. - Extract the DLL files from
ImageMagick-….ziplocated in thebinfolder that start withCORE_RLandIM_MOD_RL, and save them to the PHP root directory (where you havephp.exe), or to a directory in yourPATHvariable - Add this line to your
php.inifile:extension=php_imagick.dll - Restart the Apache/NGINX Windows service.
Check
Now check the PHP info and search for imagick. If everything is correct, you’ll see these info:

Example
You can run this code to check imagick works or not:
<?php

// Create an Imagick object
$image = new Imagick();

// Use newImage function to create new image
$image->newImage(650, 400, '#FF0000');

// Set the image format
$image->setImageFormat('png');

header('Content-type: image/png');

// Display the output image
echo $image;
?>
The article is over. Thanks for reading.
Md Obydullah
Software Engineer | Ethical Hacker & Cybersecurity...
Md Obydullah is a software engineer and full stack developer specialist at Laravel, Django, Vue.js, Node.js, Android, Linux Server, and Ethichal Hacking.