Build Node.js RESTful API CRUD with Express.js and MongoDB
In this guide, I’m going to make a simple Node.js CRUD API application with Express and MongoDB. I’ll create a products table and will implement the following APIs methods:
| Method | URL | Action |
|---|---|---|
| POST | products/create | create new product |
| GET | products | retrieve all products |
| GET | products/id | retrieve product where id=id |
| PUT | products/update/id | update product where id=id |
| DELETE | products/delete/id | delete product where id=id |
Table of Contents
- Create Project and Install Dependencies
- Connect to MongoDB
- Create Product Model
- Create Product Controller
- Register Product Routes
- The Overview
- Run and See Output
Step 1 : Create Project and Install Dependencies
Install the Express application generator globally using this command if you didn’t install:
# with NPX command (available in Node.js 8.2.0)
npx express-generator

# with NPM command
npm install -g express-generator
Now go to the project folder and create an express project called ‘crud-api-mongodb‘:
# create project
express --view=ejs nodejs-api-crud-mongodb

# go to the project folder:
cd nodejs-api-crud-mongodb
We need to install the mongoose package for MongoDB:
npm install --save mongooseStep 2 : Connect to MongoDB
In the root of the project folder, create a folder called ‘lib‘. Under lib folder make a file named ‘db.js‘. Open the newly created db.js file and paste the below code:
// Set up mongoose connection
const mongoose = require('mongoose');
let database_url = 'mongodb://localhost:27017/testdb';

// Connecting to the database
mongoose.connect(database_url, {
    keepAlive: true,
    useNewUrlParser: true,
    useUnifiedTopology: true,
    useFindAndModify: false,
}).then(() => {
    console.log("Successfully connected to the database");
}).catch(err => {
    console.log('Could not connect to the database. Exiting now...', err);
    process.exit();
});

module.exports = mongoose.connection;
In the database_url variable, enter your database URL. You can set remote URL too. I’ve set the localhost URL. In the last of the database_url, the testdb is the database name.
Now open app.js file and add this line to include the database.
// database connection
var dbConn  = require('./lib/db');
If you run the project (npm start) and everything is fine, you’ll see the connection successful message.
Step 3 : Create Product Model
In the root folder, make a directory named ‘models‘. Under models, create a file called ‘product.js‘. This is the product model. Let’s define the products table schema.
const mongoose = require('mongoose');
const Schema = mongoose.Schema;

let ProductSchema = new Schema({
    name: {type: String, required: true, max: 100},
    price: {type: Number, required: true},
});

// Export the model
module.exports = mongoose.model('Product', ProductSchema);
Step 4 : Create Product Controller
Again in the root directory of the project create a folder named ‘controllers‘. Under controllers folder, make a file called ‘product.js‘. We will write make create, read, update and delete product methods in this controller.
Open the newly created product controller and paste this code:
// include product model
const Product = require('../models/product');

// create a new Product.
exports.product_create = function (req, res) {
    // validate request
    if(!req.body.name || !req.body.price) {
        return res.status(400).send({
            success: false,
            message: "Please enter product name and price"
        });
    }

    // create a product
    let product = new Product(
        {
            name: req.body.name,
            price: req.body.price
        }
    );

    // save product in the database.
    product.save()
        .then(data => {
            res.send({
                success: true,
                message: 'Product successfully created',
                data: data
            });
        }).catch(err => {
        res.status(500).send({
            success: false,
            message: err.message || "Some error occurred while creating the product."
        });
    });
};

// retrieve and return all products.
exports.all_products = (req, res) => {
    Product.find()
        .then(data => {
            var message = "";
            if (data === undefined || data.length == 0) message = "No product found!";
            else message = 'Products successfully retrieved';

            res.send({
                success: true,
                message: message,
                data: data
            });
        }).catch(err => {
        res.status(500).send({
            success: false,
            message: err.message || "Some error occurred while retrieving products."
        });
    });
};

// find a single product with a id.
exports.product_details = (req, res) => {
    Product.findById(req.params.id)
        .then(data => {
            if(!data) {
                return res.status(404).send({
                    success: false,
                    message: "Product not found with id " + req.params.id
                });
            }
            res.send({
                success: true,
                message: 'Product successfully retrieved',
                data: data
            });
        }).catch(err => {
        if(err.kind === 'ObjectId') {
            return res.status(404).send({
                success: false,
                message: "Product not found with id " + req.params.id
            });
        }
        return res.status(500).send({
            success: false,
            message: "Error retrieving product with id " + req.params.id
        });
    });
};

// update a product  by the id.
exports.product_update = (req, res) => {
    // validate request
    if(!req.body.name || !req.body.price) {
        return res.status(400).send({
            success: false,
            message: "Please enter product name and price"
        });
    }

    // find product and update
    Product.findByIdAndUpdate(req.params.id, {
        $set: req.body
    }, {new: true})
        .then(data => {
            if(!data) {
                return res.status(404).send({
                    success: false,
                    message: "Product not found with id " + req.params.id
                });
            }
            res.send({
                success: true,
                data: data
            });
        }).catch(err => {
        if(err.kind === 'ObjectId') {
            return res.status(404).send({
                success: false,
                message: "Product not found with id " + req.params.id
            });
        }
        return res.status(500).send({
            success: false,
            message: "Error updating product with id " + req.params.id
        });
    });
};

// delete a product with the specified id.
exports.product_delete = (req, res) => {
    Product.findByIdAndRemove(req.params.id)
        .then(data => {
            if (!data) {
                return res.status(404).send({
                    success: false,
                    message: "Product not found with id " + req.params.id
                });
            }
            res.send({
                success: true,
                message: "Product successfully deleted!"
            });
        }).catch(err => {
        if (err.kind === 'ObjectId' || err.name === 'NotFound') {
            return res.status(404).send({
                success: false,
                message: "Product not found with id " + req.params.id
            });
        }
        return res.status(500).send({
            success: false,
            message: "Could not delete product with id " + req.params.id
        });
    });
};
In this controller, I’ve created the CRUD functions.
Step 5 : Register Product Routes
In this step, we will register routes to connect to the product controller’s methods.
Go to the routes folder and make a file named ‘products.js‘. Then paste this code:
const express = require('express');
const router = express.Router();

// include product controller
const product_controller = require('../controllers/product');

// routes
router.get('/', product_controller.all_products);
router.post('/create', product_controller.product_create);
router.get('/:id', product_controller.product_details);
router.put('/update/:id', product_controller.product_update);
router.delete('/delete/:id', product_controller.product_delete);

module.exports = router;
We’ve defined all product CRUD routes. Let’s import the product routes to app.js. After that, the routes will work.
var productsRouter = require('./routes/products');

app.use('/products', productsRouter);
Done. Our project is ready to run…! ?
Step 6 : The Overview
The final app.js looks like:
var createError = require('http-errors');
var express = require('express');
var path = require('path');
var cookieParser = require('cookie-parser');
var logger = require('morgan');

// database connection
var dbConn  = require('./lib/db');

var indexRouter = require('./routes/index');
var usersRouter = require('./routes/users');
var productsRouter = require('./routes/products');

var app = express();

// view engine setup
app.set('views', path.join(__dirname, 'views'));
app.set('view engine', 'ejs');

app.use(logger('dev'));
app.use(express.json());
app.use(express.urlencoded({ extended: false }));
app.use(cookieParser());
app.use(express.static(path.join(__dirname, 'public')));

app.use('/', indexRouter);
app.use('/users', usersRouter);
app.use('/products', productsRouter);

// catch 404 and forward to error handler
app.use(function(req, res, next) {
  next(createError(404));
});

// error handler
app.use(function(err, req, res, next) {
  // set locals, only providing error in development
  res.locals.message = err.message;
  res.locals.error = req.app.get('env') === 'development' ? err : {};

  // render the error page
  res.status(err.status || 500);
  res.render('error');
});

module.exports = app;
The package.json file looks like:
{
  "name": "nodejs-api-crud-mongodb",
  "version": "0.0.0",
  "private": true,
  "scripts": {
    "start": "node ./bin/www"
  },
  "dependencies": {
    "cookie-parser": "~1.4.4",
    "debug": "~2.6.9",
    "ejs": "~2.6.1",
    "express": "~4.16.1",
    "http-errors": "~1.6.3",
    "mongoose": "^5.7.4",
    "morgan": "~1.9.1"
  }
}
Step 7 : Run and See Output
We’ve finished all the tasks. Let run the project using this command:
npm startOur project will be run on port 3000 and the localhost URL looks like: http://localhost:3000. If you visit this link, you’ll see a message like ‘ Welcome to Express’.
Now let’s test the APIs using Postman application.
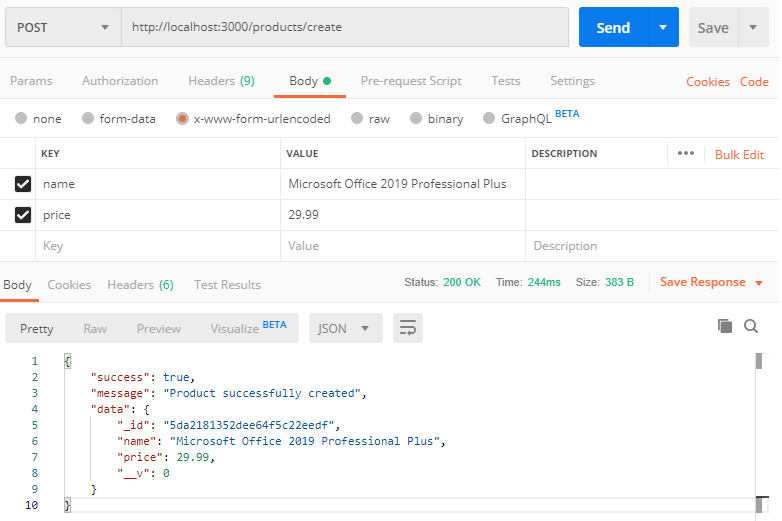
Create a Product API: http://localhost:3000/products/create
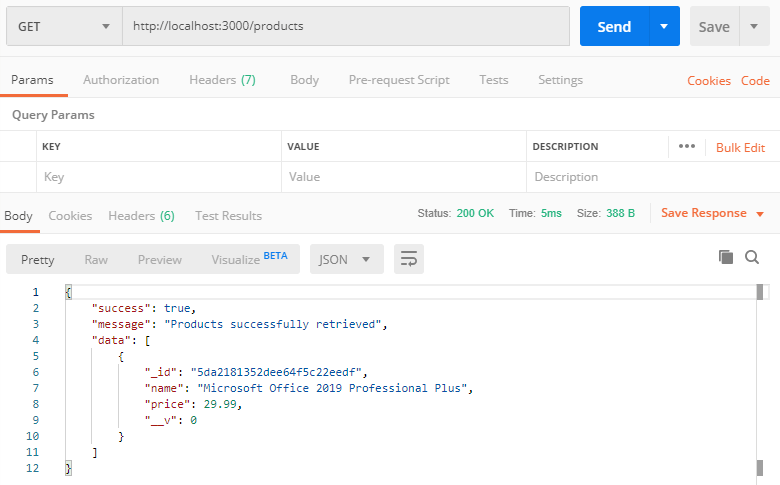
Retrieve all Products API: http://localhost:3000/products
Retrieve Single Product API: http://localhost:3000/products/:id

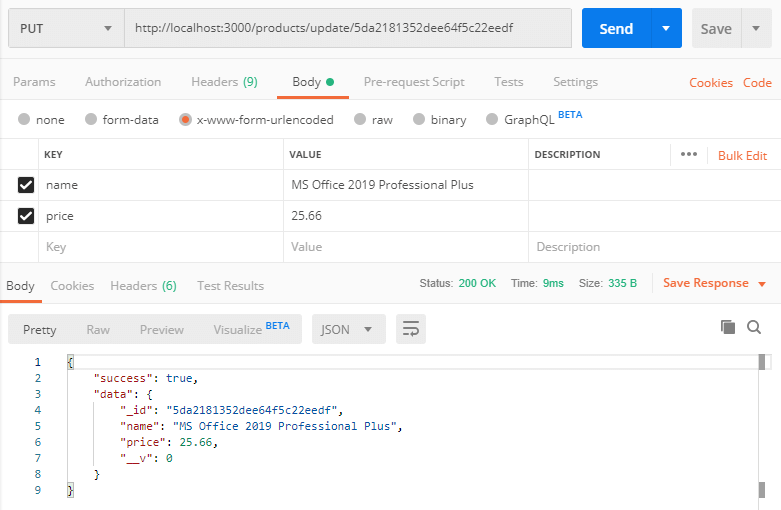
Update Product API: http://localhost:3000/products/update/:id
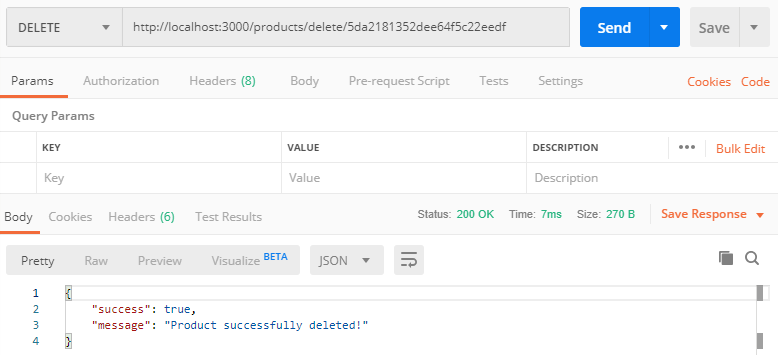
Delete Product API: http://localhost:3000/products/delete/:id
The tutorial is over. You can download this project from GitHub. Thank you.
Md Obydullah
Software Engineer | Ethical Hacker & Cybersecurity...
Md Obydullah is a software engineer and full stack developer specialist at Laravel, Django, Vue.js, Node.js, Android, Linux Server, and Ethichal Hacking.