Laravel Send Automatic Email (Birthday Notification)
Hello Artisans, today I'll talk about how we can send birthday wishes to our registered users. Sometimes we need to send our users birthday wishes or any type of email alert at a specific time. Then what did you do? Don't worry about today's tutorial about that. So, no more talk let's see about how we can send email to the user of our Application.
Note: Tested on Laravel 9.19.
Table of Contents
Create and Setup Mail
First of all, we'll create a mail class so that we can send a user mail. So, fire the below commands in the terminal.
php artisan make:mail BirthDayWishIt'll create a file under app\Mail called BirthDayWish.php. Open the file and replace with below codes.
<?php

namespace App\Mail;

use Illuminate\Bus\Queueable;
use Illuminate\Contracts\Queue\ShouldQueue;
use Illuminate\Mail\Mailable;
use Illuminate\Queue\SerializesModels;

class BirthDayWish extends Mailable
{
    use Queueable, SerializesModels;

    protected $user;

    public function __construct($user)
    {
        $this->user = $user;
    }

    /**
     * Build the message.
     *
     * @return $this
     */
    public function build()
    {
        return $this->subject('Happy Birthday '. $this->user['name'])
            ->view('birthday_wish',['user' => $this->user]);
    }
}
Create and Setup View File
Now we we'll create a blade file where we can setup our form. So let's create a view file called birthday_wish.blade.php under resources/views and paste the below code in the following file.
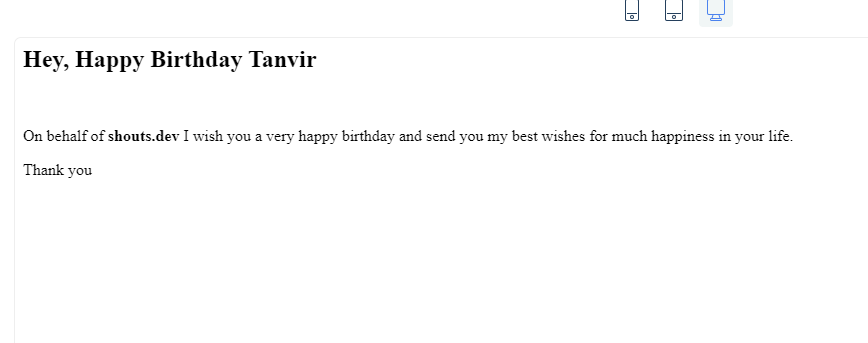
<h2>Hey, Happy Birthday {{ $user['name'] }}</h2>
<br>
<p>On behalf of <strong>shouts.dev</strong> I wish you a very happy birthday and send you my best wishes for much happiness in your life.</p>

Thank you
Create and Setup Command
New we'll create a command so that we can write our own logic for sending mails. So, fire the below commands in the terminal.
php artisan make:command SendBirthDayWishIt'll create a file under app/Console/Commands called SendBirthDayWish.php. Open the file and replace with below codes.
<?php

namespace App\Console\Commands;

use App\Mail\BirthDayWish;
use Illuminate\Console\Command;
use Illuminate\Support\Facades\Mail;

class SendBirthDayWish extends Command
{
    /**
     * The name and signature of the console command.
     *
     * @var string
     */
    protected $signature = 'send:birthdaywish';

    /**
     * The console command description.
     *
     * @var string
     */
    protected $description = 'Command For Sending Birthday Wish to User';


    public function handle()
    {
        //user your database query based on your needs
        $users = [
            [
                'id' => 1,
                'name' => 'Tanvir',
                'email' => '[email protected]',
                'dob' => '1997-05-07',
            ],
            [
                'id' => 2,
                'name' => 'shouts.dev',
                'email' => '[email protected]',
                'dob' => '2005-05-07',
            ],
        ];

        foreach ($users as $user) {
            //write your own logics
            Mail::to($user['email'])->send(new BirthDayWish($user));
        }

        return 0;
    }
}
Now we need to register the command in kernel.php. Open the file and paste the below code.
<?php

namespace App\Console;

use Illuminate\Console\Scheduling\Schedule;
use Illuminate\Foundation\Console\Kernel as ConsoleKernel;

class Kernel extends ConsoleKernel
{
    /**
     * Define the application's command schedule.
     *
     * @param  \Illuminate\Console\Scheduling\Schedule  $schedule
     * @return void
     */
    protected function schedule(Schedule $schedule)
    {
        //run the commands every minute and filter your needs based on the logic before sending the mail
        $schedule->command('send:birthdaywish')->everyMinute();
    }

    /**
     * Register the commands for the application.
     *
     * @return void
     */
    protected function commands()
    {
        $this->load(__DIR__.'/Commands');

        require base_path('routes/console.php');
    }
}
Now we need to configure our .env file for mail
MAIL_MAILER=smtp
MAIL_HOST=smtp.mailtrap.io
MAIL_PORT=25
MAIL_USERNAME=3f4aced3c7e63c
MAIL_PASSWORD=3908ea5883feb6
MAIL_ENCRYPTION=null
MAIL_FROM_ADDRESS="[email protected]"
MAIL_FROM_NAME="${APP_NAME}"
Output
And finally we're ready with our setup. It's time to check our output. Now run the below command in the terminal
php artisan send:birthdaywishIf everything goes well (hope so) you can find a below email output in your mailtrap (as we used mailtrap).

That's it for today. Hope you've enjoyed this tutorial. You can also download this tutorial from GitHub. Thanks for reading. 🙂