Laravel Login with Twitter using Laravel Socialite
Hello Artisans, today in this tutorial I’ll show how to login with Twitter in your Laravel app. For that, we are using Laravel official package called Laravel Socialite package. So let’s see how we can integrate this feature into our application.
Note: Tested on Laravel 8.65.
Table of Contents
- Install Laravel and Basic Config
- Install Laravel Socialite
- Create a Twitter app
- Setup for login with Twitter
- Setup Migration
- Setup Model
- Setup Controller
- Update Route
- Output
Install Laravel and Basic Config
Each Laravel project needs this thing. For that you can see the very beautiful article on this topic from here: Install Laravel and Basic Configurations.
Install Laravel Socialite
To install Laravel Socialite package you just have to fire the below command in your terminal
composer require laravel/socialiteCreate a Twitter app
Now, we have to create a twitter app from twitter developer panel. Remember one thing, if you don’t have an account you need to register first, after successful registration you can create a app.
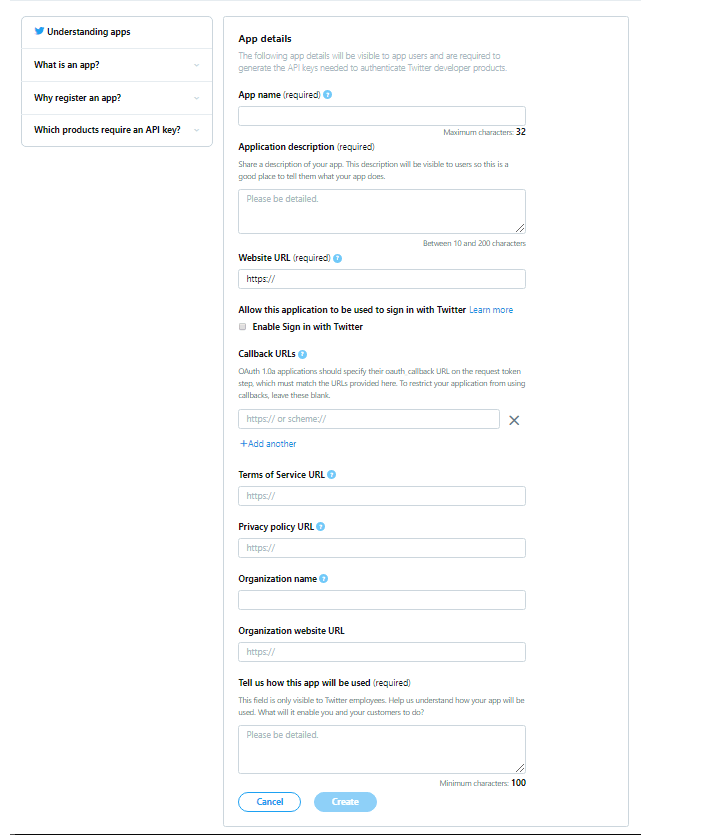
Now, click on Create an app. The below form will be appear
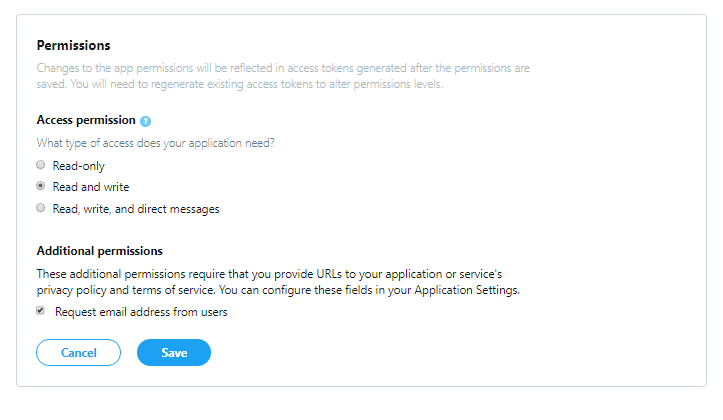
Now, go to the Permission tab and tick the checkbox “Request email address from users” under the additional permission section. See, image for more info.
Setup for login with Twitter
First of all, we’ve to modify our login.blade.php. So, paste the following code in your blade file to add login button with Twitter
@extends('layouts.app')
@section('content')
<div class="container">
    <div class="row justify-content-center">
        <div class="col-md-8">
            <div class="card">
                <div class="card-header">{{ __('Login') }}</div>

                <div class="card-body">
                    <form method="POST" action="{{ route('login') }}">
                        @csrf

                        <div class="form-group row">
                            <label for="email" class="col-md-4 col-form-label text-md-right">{{ __('E-Mail Address') }}</label>

                            <div class="col-md-6">
                                <input id="email" type="email" class="form-control @error('email') is-invalid @enderror" name="email" value="{{ old('email') }}" required autocomplete="email" autofocus>

                                @error('email')
                                    <span class="invalid-feedback" role="alert">
                                        <strong>{{ $message }}</strong>
                                    </span>
                                @enderror
                            </div>
                        </div>

                        <div class="form-group row">
                            <label for="password" class="col-md-4 col-form-label text-md-right">{{ __('Password') }}</label>

                            <div class="col-md-6">
                                <input id="password" type="password" class="form-control @error('password') is-invalid @enderror" name="password" required autocomplete="current-password">

                                @error('password')
                                    <span class="invalid-feedback" role="alert">
                                        <strong>{{ $message }}</strong>
                                    </span>
                                @enderror
                            </div>
                        </div>

                        <div class="form-group row">
                            <div class="col-md-6 offset-md-4">
                                <div class="form-check">
                                    <input class="form-check-input" type="checkbox" name="remember" id="remember" {{ old('remember') ? 'checked' : '' }}>

                                    <label class="form-check-label" for="remember">
                                        {{ __('Remember Me') }}
                                    </label>
                                </div>
                            </div>
                        </div>

                        <div class="form-group row mb-0">
                            <div class="col-md-8 offset-md-4">
                                <button type="submit" class="btn btn-primary">
                                    {{ __('Login') }}
                                </button>

                                @if (Route::has('password.request'))
                                    <a class="btn btn-link" href="{{ route('password.request') }}">
                                        {{ __('Forgot Your Password?') }}
                                    </a>
                                @endif
                            </div>
                        </div>
                        <div class="row">
                            <div class="col-md-12 text-right">
                                <a href="{{url('/redirect/twitter')}}" class="btn btn-primary">Login with Twitter</a>
                            </div>
                        </div>
                    </form>
                </div>
            </div>
        </div>
    </div>
</div>
@endsection
Now, we’ve to setup the Twitter API key and Secret in our config/services.php. For that go to Keys and Tokens section of your created twitter app. Now put the below code in your services.php file
'twitter' => [
        'client_id' => 'XXXXXX-XXXXXX', //replace with your client_id
        'client_secret' => 'XXXXXX-XXXXXX', //replace with your client_secret
        'redirect' => '',
    ]
Setup Migration
We need to create a controller, model and migration file. For that we just have to fire the below command in the terminal
php artisan make:model Twitter -mcrThis will create a controller, model and migration file. For now, we just set up the migration file. We will handle with model and controller later. So open up the file paste the following code.
<?php

use Illuminate\Database\Migrations\Migration;
use Illuminate\Database\Schema\Blueprint;
use Illuminate\Support\Facades\Schema;

class CreateTwittersTable extends Migration
{
    public function up()
    {
        Schema::create('twitters', function (Blueprint $table) {
            $table->id();
            $table->foreignId('user_id')->constrained()->cascadeOnDelete();
            $table->string('provider_user_id');
            $table->string('provider');
            $table->timestamps();
        });
    }

    public function down()
    {
        Schema::dropIfExists('twitters');
    }
}
Now migrate the file using the below command.
php artisan migrateSetup Model
Now open up the Twitter.php file and paste the following code:
<?php

namespace App\Models;

use Illuminate\Database\Eloquent\Factories\HasFactory;
use Illuminate\Database\Eloquent\Model;

class Twitter extends Model
{
    use HasFactory;

    protected $fillable = ['user_id', 'provider_user_id', 'provider'];

    public function user(): \Illuminate\Database\Eloquent\Relations\BelongsTo
    {
        return $this->belongsTo(User::class);
    }
}
Setup Controller
Now we need to update our controller. Open TwitterController.php and paste the following code:
<?php

namespace App\Http\Controllers;

use App\Models\Twitter;
use App\Models\User;
use Illuminate\Http\Request;
use Illuminate\Support\Str;
use Laravel\Socialite\Contracts\User as ProviderUser;
use Laravel\Socialite\Facades\Socialite;

class TwitterController extends Controller
{
    public function createOrGetUser(ProviderUser $providerUser, $provider)
    {
        $account = Twitter::whereProvider($provider)
            ->whereProviderUserId($providerUser->getId())
            ->first();
        if ($account) {
            return $account->user;
        } else {
            $account = new Twitter([
                'provider_user_id' => $providerUser->getId(),
                'provider' => $provider
            ]);
            $user = User::whereEmail($providerUser->getEmail())->first();
            if (!$user) {
                $user = User::create([
                    'email' => $providerUser->getEmail(),
                    'name' => $providerUser->getName(),
                    'password' => bcrypt(Str::random(8))
                ]);
            }
            $account->user()->associate($user);
            $account->save();
            return $user;
        }
    }

    public function redirect($provider)
    {
        return Socialite::driver($provider)->redirect();
    }

    public function callback($provider)
    {
        $user = $this->createOrGetUser(Socialite::driver($provider)->user(), $provider);
        auth()->login($user);
        return redirect()->to('/home');
    }
}
Update Route
Finally, we’ve to put the below code in our web.php file:
Route::get('/redirect/{provider}', [\App\Http\Controllers\TwitterController::class,'redirect']);
Route::get('/callback/{provider}', [\App\Http\Controllers\TwitterController::class,'callback']);
Output
Now we are ready to run our application. Now if you want to log with Twitter, click the “Login with Twitter“
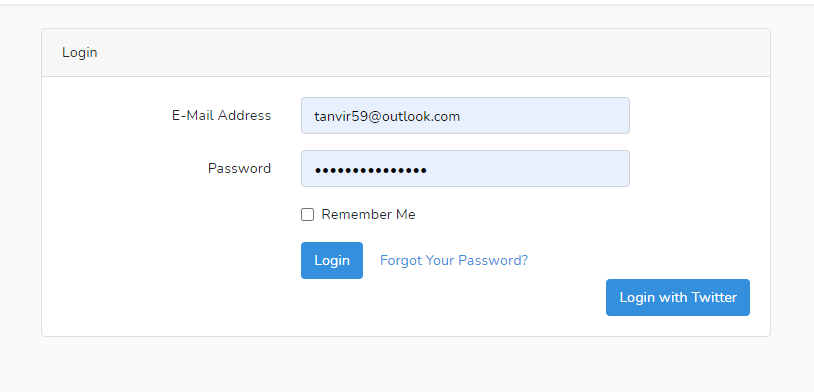
After clicking, you will be redirected to Twitter login page where you will be able to login with your Twitter credential.

That’s all for today. Hope you will enjoy this tutorial. You can also download the project from GitHub Thanks for reading.