Laravel Login with Google
Today, we will discuss about Laravel Google login. I’ll use Socialite package for this. Let’s follow these steps:
Table of Contents
- Install Laravel and Basic Configurations
- Create Laravel Authentication
- Install & Configure laravel/socialite Package
- Create a Controller
- Register Routes
- Create Google Client ID
- Modify Login Page
- Test Google Login
Step 1 : Install Laravel and Basic Configurations
Each Laravel project needs this thing. That’s why I have written an article on this topic. Please see this part from here: Install Laravel and Basic Configurations.
After completing basic configurations, go to database/migrations folder and open create_users_table migration file. We are going to add one field called ‘google_id’.
public function up()
{
    Schema::create('users', function (Blueprint $table) {
        $table->bigIncrements('id');
        $table->string('name');
        $table->string('email')->unique();
        $table->string('google_id');
        $table->timestamp('email_verified_at')->nullable();
        $table->string('password');
        $table->rememberToken();
        $table->timestamps();
    });
}
Step 2 : Create Laravel Authentication
Laravel has primary authentication. Run this command to get the
authentication:
php artisan make:auth
Run this command to migrate the tables:
php artisan migrate
Now run the laravel project to see the login, register page:
php artisan serve
The login URL is http://localhost:8000/login

Step 3 : Install & Configure laravel/socialite Package
Fire this command to install laravel/socialite package:
composer require laravel/socialite
Now we have to register Socialite provider and aliase. Go to config >> app.php and find the providers & add this:
'providers' => [
    // ...
    Laravel\Socialite\SocialiteServiceProvider::class,
]
Find aliases in the file and add this line:
'aliases' => [
    // ...
    'Socialite' => Laravel\Socialite\Facades\Socialite::class,
]
Step 4 : Create a Controller
Let’s create a controller named ‘GoogleAuthController‘:
php artisan make:controller GoogleAuthController
Open GoogleAuthController.php from app\Http\Controllers and paste this code:
<?php

namespace App\Http\Controllers;

use Illuminate\Http\Request;
use App\User;
use Socialite;
use Auth;
use Exception;


class GoogleAuthController extends Controller
{
    public function redirectToProvider()
    {
        return Socialite::driver('google')->redirect();
    }

    public function handleProviderCallback()
    {
        try {
            $googleUser = Socialite::driver('google')->user();
            $existUser = User::where('email', $googleUser->email)->first();

            if ($existUser) {
                Auth::loginUsingId($existUser->id);
            } else {
                $user = new User;
                $user->name = $googleUser->name;
                $user->email = $googleUser->email;
                $user->google_id = $googleUser->id;
                $user->password = md5(rand(1, 10000));
                $user->save();
                Auth::loginUsingId($user->id);
            }
            return redirect()->to('/home');
        } catch (Exception $e) {
            return 'error';
        }
    }
}
Step 5 : Register Routes
Open routes>>web.php and register the routes:
<?php
Auth::routes();
Route::get('/google-login', 'GoogleAuthController@redirectToProvider');
Route::get('/callback', 'GoogleAuthController@handleProviderCallback');
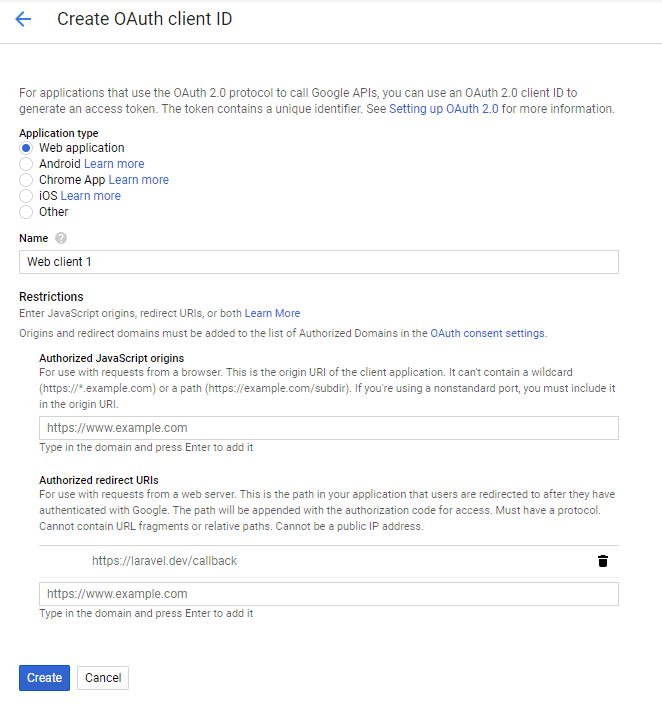
Route::get('/home', 'HomeController@index')->name('home');Step 6 : Create Google Client ID
Go to Googles developers console (https://console.developers.google.com) and login with your gmail. Then create a project and create an OAuth client ID. In the Authorized redirect URIs, enter your project’s callback link like http://localost:8000/callback.
After clicking on Create button you will get the client ID and client secret.
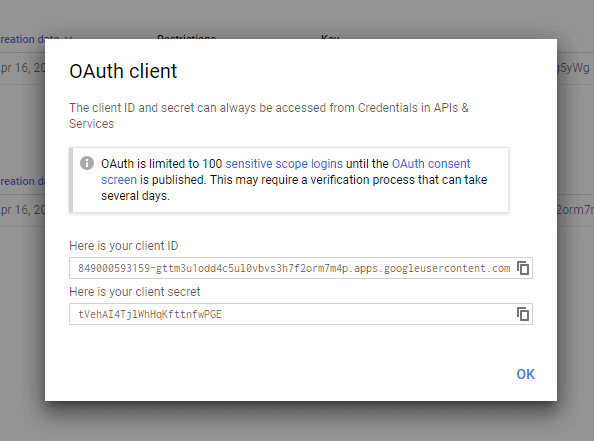
Now go to config>>services.php file and add this:
'google' => [
    'client_id' => 'HERE',
    'client_secret' => 'HERE',
    'redirect' => 'http://localhost:8000/callback'
],
Enter your client_id and client_secret here.
Step 7 : Modify Login Page
In this step, we will add a button called “Login with Google” in the login page. Open this file resources > views > auth > login.blade.php and paste this code:
@extends('layouts.app')

@section('content')
    <div class="container">
        <div class="row justify-content-center">
            <div class="col-md-8">
                <div class="card">
                    <div class="card-header">{{ __('Login') }}</div>

                    <div class="card-body">
                        <form method="POST" action="{{ route('login') }}">
                            @csrf

                            <div class="form-group row">
                                <label for="email"
                                       class="col-md-4 col-form-label text-md-right">{{ __('E-Mail Address') }}</label>

                                <div class="col-md-6">
                                    <input id="email" type="email"
                                           class="form-control{{ $errors->has('email') ? ' is-invalid' : '' }}"
                                           name="email" value="{{ old('email') }}" required autofocus>

                                    @if ($errors->has('email'))
                                        <span class="invalid-feedback" role="alert">
                                        <strong>{{ $errors->first('email') }}</strong>
                                    </span>
                                    @endif
                                </div>
                            </div>

                            <div class="form-group row">
                                <label for="password"
                                       class="col-md-4 col-form-label text-md-right">{{ __('Password') }}</label>

                                <div class="col-md-6">
                                    <input id="password" type="password"
                                           class="form-control{{ $errors->has('password') ? ' is-invalid' : '' }}"
                                           name="password" required>

                                    @if ($errors->has('password'))
                                        <span class="invalid-feedback" role="alert">
                                        <strong>{{ $errors->first('password') }}</strong>
                                    </span>
                                    @endif
                                </div>
                            </div>

                            <div class="form-group row">
                                <div class="col-md-6 offset-md-4">
                                    <div class="form-check">
                                        <input class="form-check-input" type="checkbox" name="remember"
                                               id="remember" {{ old('remember') ? 'checked' : '' }}>

                                        <label class="form-check-label" for="remember">
                                            {{ __('Remember Me') }}
                                        </label>
                                    </div>
                                </div>
                            </div>

                            <div class="form-group row mb-0">
                                <div class="col-md-8 offset-md-4">
                                    <button type="submit" class="btn btn-primary">
                                        {{ __('Login') }}
                                    </button>
                                    <a href="{{ url('/google-login') }}" class="btn btn-primary">Login With Google</a>

                                    @if (Route::has('password.request'))
                                        <a class="btn btn-link" href="{{ route('password.request') }}">
                                            {{ __('Forgot Your Password?') }}
                                        </a>
                                    @endif
                                </div>
                            </div>
                        </form>
                    </div>
                </div>
            </div>
        </div>
    </div>
@endsection
Step 8 : Test Google Login
Now visit the login URL of your project http://localhost:8000/login
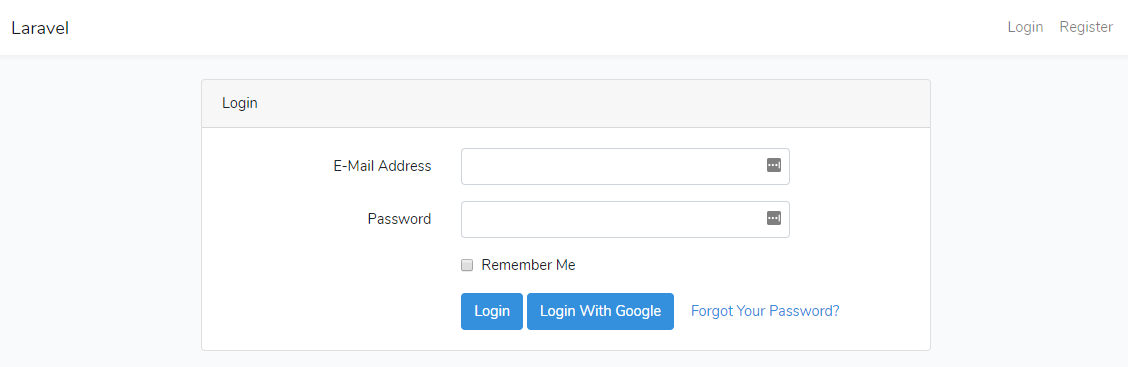
Click on the ‘Login With Google’ button and login with your gmail. If everything is fine, you’ll see this:

You can download this project from GitHub.
We have successfully logged-in with Google.
Md Obydullah
Software Engineer | Ethical Hacker & Cybersecurity...
Md Obydullah is a software engineer and full stack developer specialist at Laravel, Django, Vue.js, Node.js, Android, Linux Server, and Ethichal Hacking.