Laravel Custom Validation during Form Submission
Hello Artisans, today I'll show you how to use custom validation in Laravel 9. Custom validation is a quite needy thing when the question comes to fulfill our client requirements. To acquire our own custom validation we just need complete a few steps. So let's see how we can use our own custom validation in our Laravel application.
Note: Tested on Laravel 9.19.
Table of Contents
Create and Setup Rule
First of all, create a rule so that we can write our own logic and validation message to show the validate the form. So, fire the below commands in the terminal.
php artisan make:rule CheckStackRuleIt'll create a rule under app\Rules called CheckStackRule.php. Open the file and replace with below codes.
<?php

namespace App\Rules;

use Illuminate\Contracts\Validation\Rule;

class CheckStackRule implements Rule
{
    public function __construct()
    {
        //
    }


    public function passes($attribute, $value)
    {
        //put your own logic here
        if ($value == 'laravel') {
            return true;
        }
        else{
            return false;
        }
    }

    public function message()
    {
        return 'The :attribute should be Laravel.';
    }
}
Create and Setup Controller
Then we'll create a controller so that we can use our own created custom validation. So, fire the below commands in the terminal.
php artisan make:controller CustomValidationControllerIt'll create a rule under app\Http\Controllers called CustomValidationController.php. Open the file and replace with below codes.
<?php
namespace App\Http\Controllers;
use App\Rules\CheckStackRule;
use Illuminate\Http\Request;
class CustomValidationController extends Controller
{
public function store(Request $request)
{
$request->validate([
'stack' => [
'required',
new CheckStackRule()
]
]);
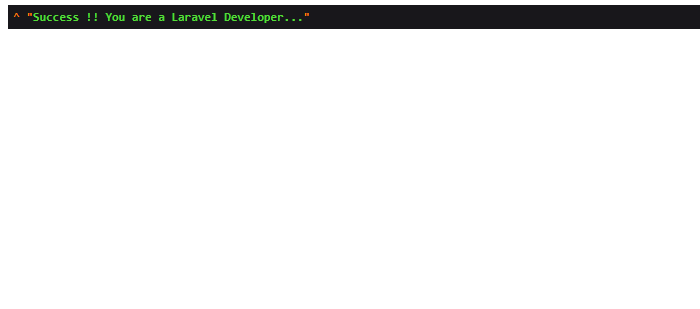
dd("Success !! You are a Laravel Developer...");
}
}
Define Routes
Now we'll set route fromm where we can check our validation rule.
<?php

use App\Http\Controllers\CustomValidationController;
use Illuminate\Support\Facades\Route;

Route::get('/', function () {
    return view('custom-validation');
});

Route::post('/custom-validation/store', [CustomValidationController::class, 'store'])->name('custom.validation.store');
Create and Setup Blade File
Now we we'll create a blade file where we can setup our form. So let's create a view file called custom-validation.blade.php under resources/views and paste the below code in the following file.
<!DOCTYPE html>
<html>
<head>
    <title>Laravel 9 Custom Validation</title>
    <link rel="stylesheet" href="https://stackpath.bootstrapcdn.com/bootstrap/4.3.1/css/bootstrap.min.css" integrity="sha384-ggOyR0iXCbMQv3Xipma34MD+dH/1fQ784/j6cY/iJTQUOhcWr7x9JvoRxT2MZw1T" crossorigin="anonymous">
    <link rel="stylesheet" href="https://cdnjs.cloudflare.com/ajax/libs/font-awesome/4.7.0/css/font-awesome.css" integrity="sha256-NuCn4IvuZXdBaFKJOAcsU2Q3ZpwbdFisd5dux4jkQ5w=" crossorigin="anonymous" />
    <script src="https://code.jquery.com/jquery-3.3.1.slim.min.js" integrity="sha384-q8i/X+965DzO0rT7abK41JStQIAqVgRVzpbzo5smXKp4YfRvH+8abtTE1Pi6jizo" crossorigin="anonymous"></script>
    <script src="https://cdnjs.cloudflare.com/ajax/libs/popper.js/1.14.7/umd/popper.min.js" integrity="sha384-UO2eT0CpHqdSJQ6hJty5KVphtPhzWj9WO1clHTMGa3JDZwrnQq4sF86dIHNDz0W1" crossorigin="anonymous"></script>
    <script src="https://stackpath.bootstrapcdn.com/bootstrap/4.3.1/js/bootstrap.min.js" integrity="sha384-JjSmVgyd0p3pXB1rRibZUAYoIIy6OrQ6VrjIEaFf/nJGzIxFDsf4x0xIM+B07jRM" crossorigin="anonymous"></script>
</head>
<body>
<div class="container">
    <div class="row">
        <div class="col-md-6 offset-3 mt-5">
            <div class="card mt-5">
                <div class="card-header text-center bg-info">
                    <h2 class="text-white"> <strong>Custom Validation</strong></h2>
                </div>
                <div class="card-body">
                    @if (count($errors) > 0)
                        <ul class="alert alert-danger pl-5">
                            @foreach($errors->all() as $error)
                                <li>{{ $error }}</li>
                            @endforeach
                        </ul>
                    @endif
                    <form action="{{ route('custom.validation.store') }}" method="post">
                        @csrf
                        <div class="form-group">
                            <label>Your Stack</label>
                            <select name="stack" class="form-control">
                                <option value="">Select One</option>
                                <option value="laravel" {{ old('stack') == 'laravel' ? 'selected' : '' }}>Laravel</option>
                                <option value="react" {{ old('stack') == 'react' ? 'selected' : '' }}>React</option>
                                <option value="vue" {{ old('stack') == 'vue' ? 'selected' : '' }}>Vue</option>
                                <option value="django" {{ old('stack') == 'django' ? 'selected' : '' }}>Django</option>
                            </select>
                        </div>
                        <div class="text-center">
                            <button class="btn btn-success"><i class="fa fa-floppy-o" aria-hidden="true"></i> Go </button>
                        </div>
                    </form>
                </div>
            </div>
        </div>
    </div>
</div>
</body>
</html>
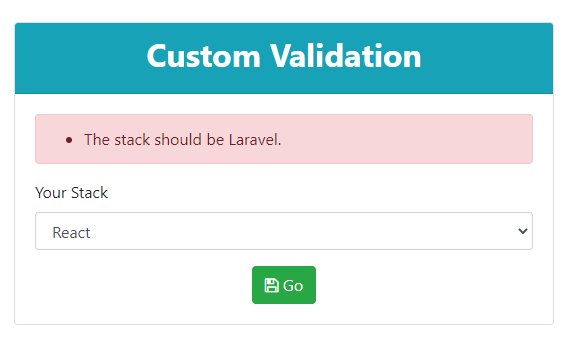
Output
And finally we're ready with our setup. It's time to check our output. Now go to http://127.0.0.1:8000, If everything goes well (hope so) you'll find a below output.
That's it for today. I hope you've enjoyed this tutorial. You can also download this tutorial from GitHub. Thanks for reading. 🙂