Auto Deploy Vue.js App to AWS S3 Using GitLab CI/CD
In this tutorial, we’re going to learn a very interesting thing. Today we will auto-deploy vue.js application to Amazon AWS S3 using GitLab Continuous Integration/Continuous Delivery (CI/CD). Let’s start:
Table of Contents
- Create S3 Bucket & IAM User
- GitLab CI Configuration
- Know The Configuration
- Create GitLab Project & Set Variables
- Push Project & Test
Create S3 Bucket & IAM User
Login to your AWS account and go to the S3 Console. Create a new S3 bucket and set permissions to public access.
After creating an S3 bucket, we need to create an IAM user to access the S3 bucket. Go to the IAM Management Console and create a user. At the time of creating the user, select “Programmatic access” as access type.
We have to attach a policy for the user. For now, let’s select the AmazonS3FullAccess policy. For better security, you should add custom policy later.
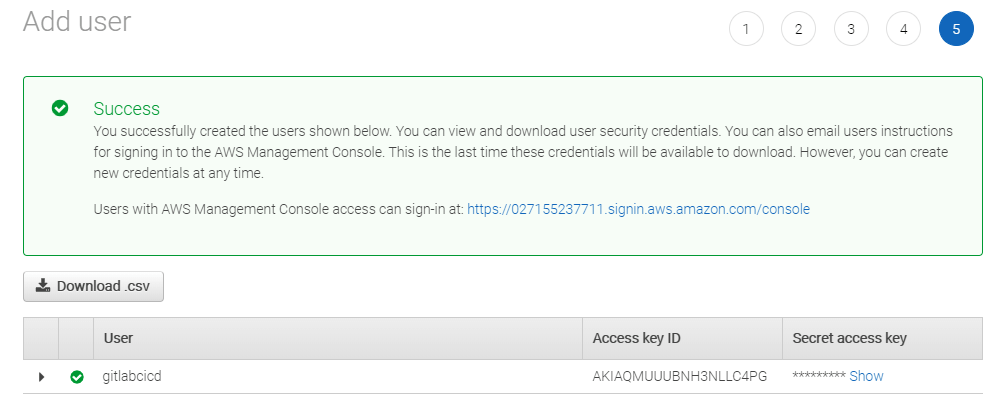
After attaching policy, click next and create a user. At the end, you’ll get Access key ID & Secret access key like this:

GitLab CI Configuration
Go to your existing Vue.js project directory or create a Vue project (vue create vue-s3) and go to the project folder. Now create a GitLab CI configuration file called .gitlab-ci.yml. Let’s configure this file:
stages:
   - build
   - deploy

# build stage
build_app:
   image: node:alpine
   stage: build
   only:
      - master
   script:
      - npm install
      - npm run build
   cache:
     paths:
       - node_modules/
   artifacts:
      paths:
         # build folder
         - dist/
      expire_in: 1 hour

# production stage
production:
   image: python:alpine
   stage: deploy
   only:
      - master
   script:
      - pip install awscli
      - aws s3 sync ./dist s3://YOUR_BUCKET_NAME
Know The Configuration
In the config file, we’ve added two stages means two steps named build & deploy. In the build stage, our application will be built and in the deploy stage, the app will be published for visitors.
Let’s know some tags of this file in short of the build stage:
image: The docker image we need in a stage to run scripts. In the build stage, we’ve written node:alpine image. Because for Vue.js application we need Node.js.
stage: The stage name we’ve defined in the stages to identify step.
only: The git branch name or tags to run as deployment.
script: The commands to build the application.
artifacts: We’ve two stages. In the build stage, we’re building the app and the built data are stored in dist folder. In the deploy stage, we need the dist folder’s data. With artifacts, we can keep the dist folder available for the deploy stage. and we can the expiration time too.
In the production stage, we’ve taken python:alpine image. Because to install awscli package, we need the python image. Using awscli package, we can do S3’s tasks. You can search for awscli to know more details.
Create GitLab Project & set Variables
Go to GitLab and create a project. After creating the project, please don’t push the local project to live. We need to do one thing.
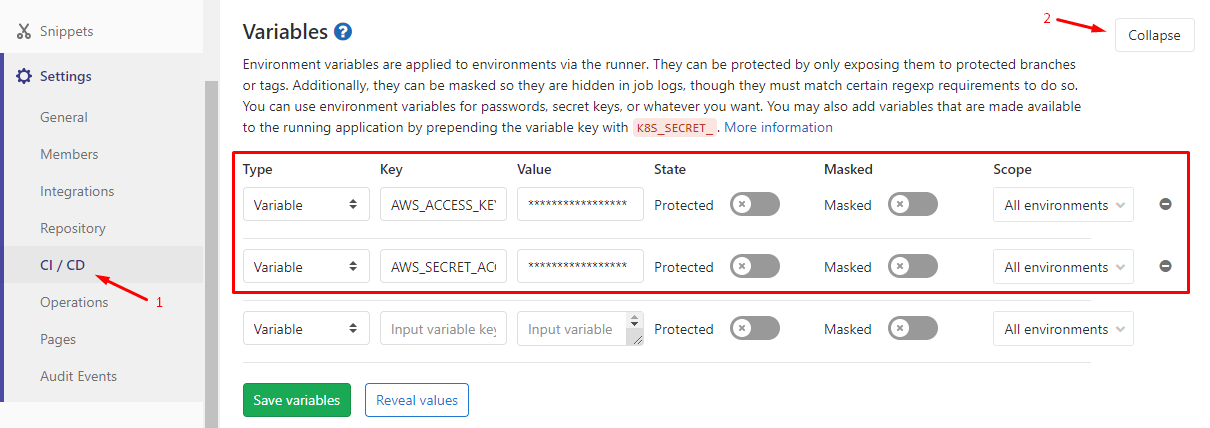
Navigate to CI / CD Settings and expand Variables. We have to define the IAM’s AWS_ACCESS_KEY_ID & AWS_SECRET_ACCESS_KEY like this:

Push Project & Test
We’ve completed all the tasks. Let’s push the local Vue.js application to GitLab. From the CI/CD nav, go to Pipelines page to show the process. If you follow all the steps correctly, your application will be deployed to AWS S3 successfully.

Now you can update your application content locally & push to GitLab to see the auto-deploy process in the Pipelines page.
The tutorial is over. You can download this project from GitHub. Thank you.
Md Obydullah
Software Engineer | Ethical Hacker & Cybersecurity...
Md Obydullah is a software engineer and full stack developer specialist at Laravel, Django, Vue.js, Node.js, Android, Linux Server, and Ethichal Hacking.