Laravel Upload Image using Summernote Editor
Hello Artisans, today I'll show you how to implement Summernote editor in our Laravel Application. Not only that we also show that how we can upload Summernote content in our database. Let's see how we can implement/upload content in our database through our Laravel Application.
Note: Tested on Laravel 9.2.
Table of Contents
- Create a Fresh Laravel Application
- Modify User Migration and Model
- Create and Setup Controller
- Setup Blade File
- Output
Create a Fresh Laravel Application
At first we'll install a fresh Laravel application by invoking the below command in our terminal
composer create-project --prefer-dist laravel/laravel summernote-image-uploador if you've Laravel installer
laravel new summernote-image-uploadModify User Migration and Model
Now we need to modify our user migration so that we can put the Summernote content here. So replace your code with mine
<?php

use Illuminate\Database\Migrations\Migration;
use Illuminate\Database\Schema\Blueprint;
use Illuminate\Support\Facades\Schema;

return new class extends Migration
{
    public function up()
    {
        Schema::create('users', function (Blueprint $table) {
            $table->id();
            $table->string('name');
            $table->string('email')->unique();
            $table->timestamp('email_verified_at')->nullable();
            $table->string('password');
            $table->longText('content')->nullable(); //for storing the summernote content
            $table->rememberToken();
            $table->timestamps();
        });
    }

    public function down()
    {
        Schema::dropIfExists('users');
    }
};
Now migrate the table. Fire the below command.
php artisan migrateNow we need to add the content field in $fillable property of User.php. So, finally out fillable array will be look like below
protected $fillable = [
        'name',
        'email',
        'password',
        'content'
    ];
Create and Setup Controller
Now we need to setup our controller so that we can put our logic and save the content in our users table. So, at first we'll create a controller called UserController.php using below command
php artisan make:controller UserControllerNow open the UserController.php file and replace the code with mine
<?php

namespace App\Http\Controllers;

use App\Models\User;
use DOMDocument;
use Illuminate\Http\Request;

class UserController extends Controller
{
    public function store(Request $request)
    {
        $request->validate([
            'name' => 'required',
            'email' => 'required',
            'password' => 'required|confirmed',
            'content' => 'required',
        ]);

        $content = $request->content;
        $dom = new DomDocument();
        $dom->loadHtml($content, LIBXML_HTML_NOIMPLIED | LIBXML_HTML_NODEFDTD);
        $imageFile = $dom->getElementsByTagName('imageFile');

        foreach($imageFile as $item => $image){
            $data = $image->getAttribute('src');
            list($type, $data) = explode(';', $data);
            list(, $data)      = explode(',', $data);
            $imgeData = base64_decode($data);
            $image_name= "/upload/" . time().$item.'.png';
            $path = public_path() . $image_name;
            file_put_contents($path, $imgeData);

            $image->removeAttribute('src');
            $image->setAttribute('src', $image_name);
        }

        $content = $dom->saveHTML();

        User::create([
            'name' => $request->name,
            'email' => $request->email,
            'password' => bcrypt($request->password),
            'content' => $content,
        ]);

        dd($content);
    }
}
Setup Blade File
Now we're done with coding parts. Now we need to setup our blade file. Now open the welcome.blade.php and replace your code with mine.
<!DOCTYPE html>
<html lang="{{ str_replace('_', '-', app()->getLocale()) }}">
<meta charset="utf-8">
<meta name="viewport" content="width=device-width, initial-scale=1">
<title>Laravel 9 Summernote Editor Image Upload Demo</title>
<link href="https://cdn.jsdelivr.net/npm/[email protected]/dist/css/bootstrap.min.css" rel="stylesheet">
<link href="https://cdn.jsdelivr.net/npm/[email protected]/dist/summernote.min.css" rel="stylesheet">
</head>
<body>
<div class="container mt-5">
    <div class="row justify-content-center">
        <div class="col-md-8">
            <form method="post" action="{{ route('user.store') }}" enctype="multipart/form-data">
                @csrf
                <div class="form-group mb-2">
                    <label>Name</label>
                    <input type="text" name="name" class="form-control" placeholder="Enter Name"/>
                    <span class="text-danger">{{ $errors->first('name') }}</span>
                </div>
                <div class="form-group mb-2">
                    <label>Email</label>
                    <input type="email" name="email" class="form-control" placeholder="Enter Email"/>
                    <span class="text-danger">{{ $errors->first('email') }}</span>
                </div>
                <div class="form-group mb-2">
                    <label>Password</label>
                    <input type="password" name="password" class="form-control" placeholder="Enter Password"/>
                    <span class="text-danger">{{ $errors->first('password') }}</span>
                </div>
                <div class="form-group mb-2">
                    <label>Confirm Password</label>
                    <input type="password" name="password_confirmation" class="form-control" placeholder="Confirm Password"/>
                    <span class="text-danger">{{ $errors->first('password_confirmation') }}</span>
                </div>
                <div class="form-group mb-2">
                    <label>Description</label>
                    <textarea id="summernote" name="content"></textarea>
                </div>
                <span class="text-danger">{{ $errors->first('content') }}</span>

                <div class="form-group text-center">
                    <button type="submit" class="btn btn-danger btn-block">Create</button>
                </div>
            </form>
        </div>
    </div>
</div>
<script src="https://ajax.googleapis.com/ajax/libs/jquery/3.5.1/jquery.min.js"></script>
<script src="https://cdn.jsdelivr.net/npm/[email protected]/dist/js/bootstrap.min.js"></script>
<script src="https://cdn.jsdelivr.net/npm/[email protected]/dist/summernote.min.js"></script>
<script type="text/javascript">
    $(document).ready(function () {
        $('#summernote').summernote({
            height: 450,
        });
    });
</script>
</body>
</html>
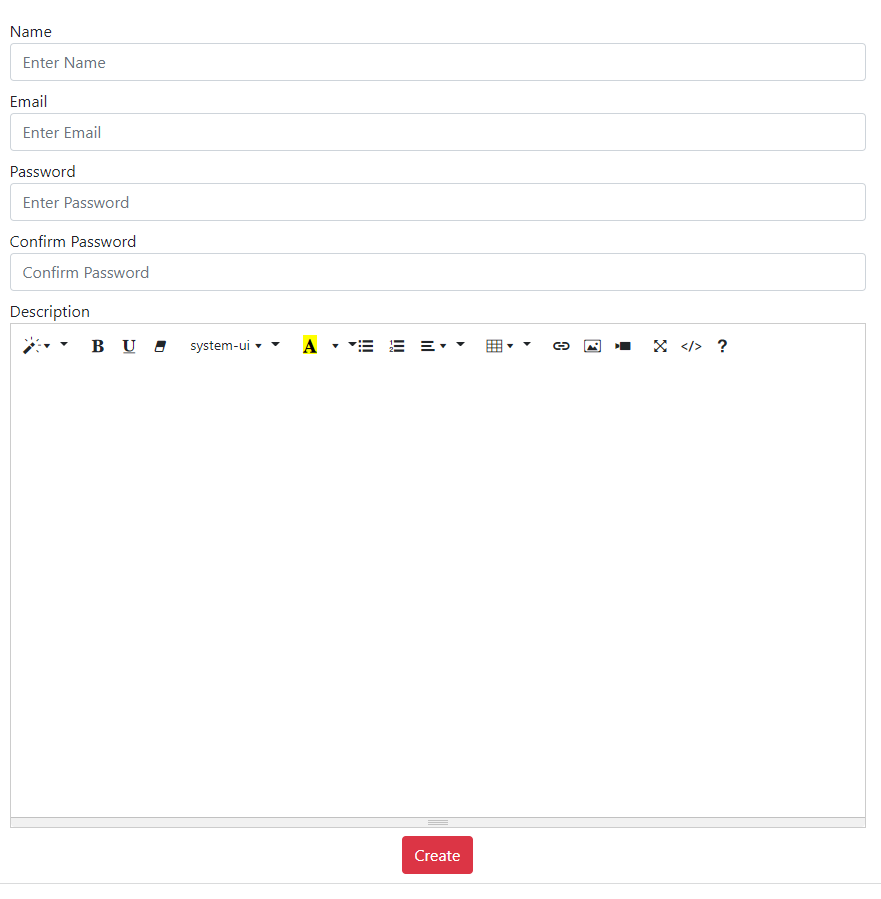
Output
Now we're ready to view the output of our application. Go to http://127.0.0.1:8000 and if everything goes well (I hope so) you'll find the below output
That's it for today. Hope you'll enjoy this tutorial. You can also download this tutorial from GitHub. Thanks for reading. 🙂